fbpx

Water Softener Clogged—What Should You Do?

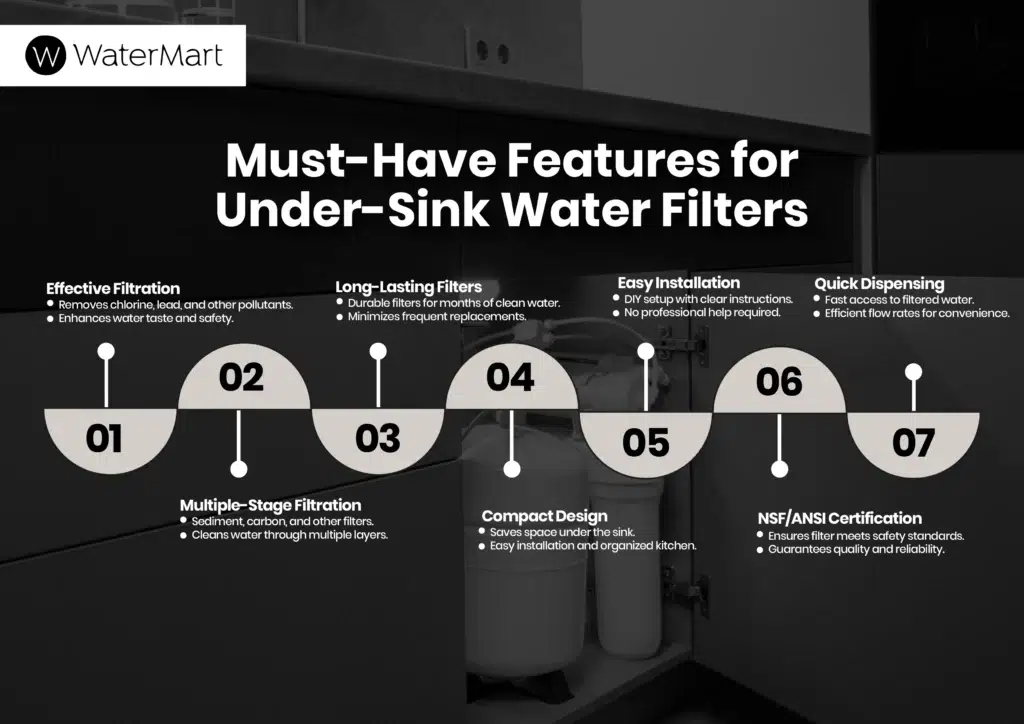
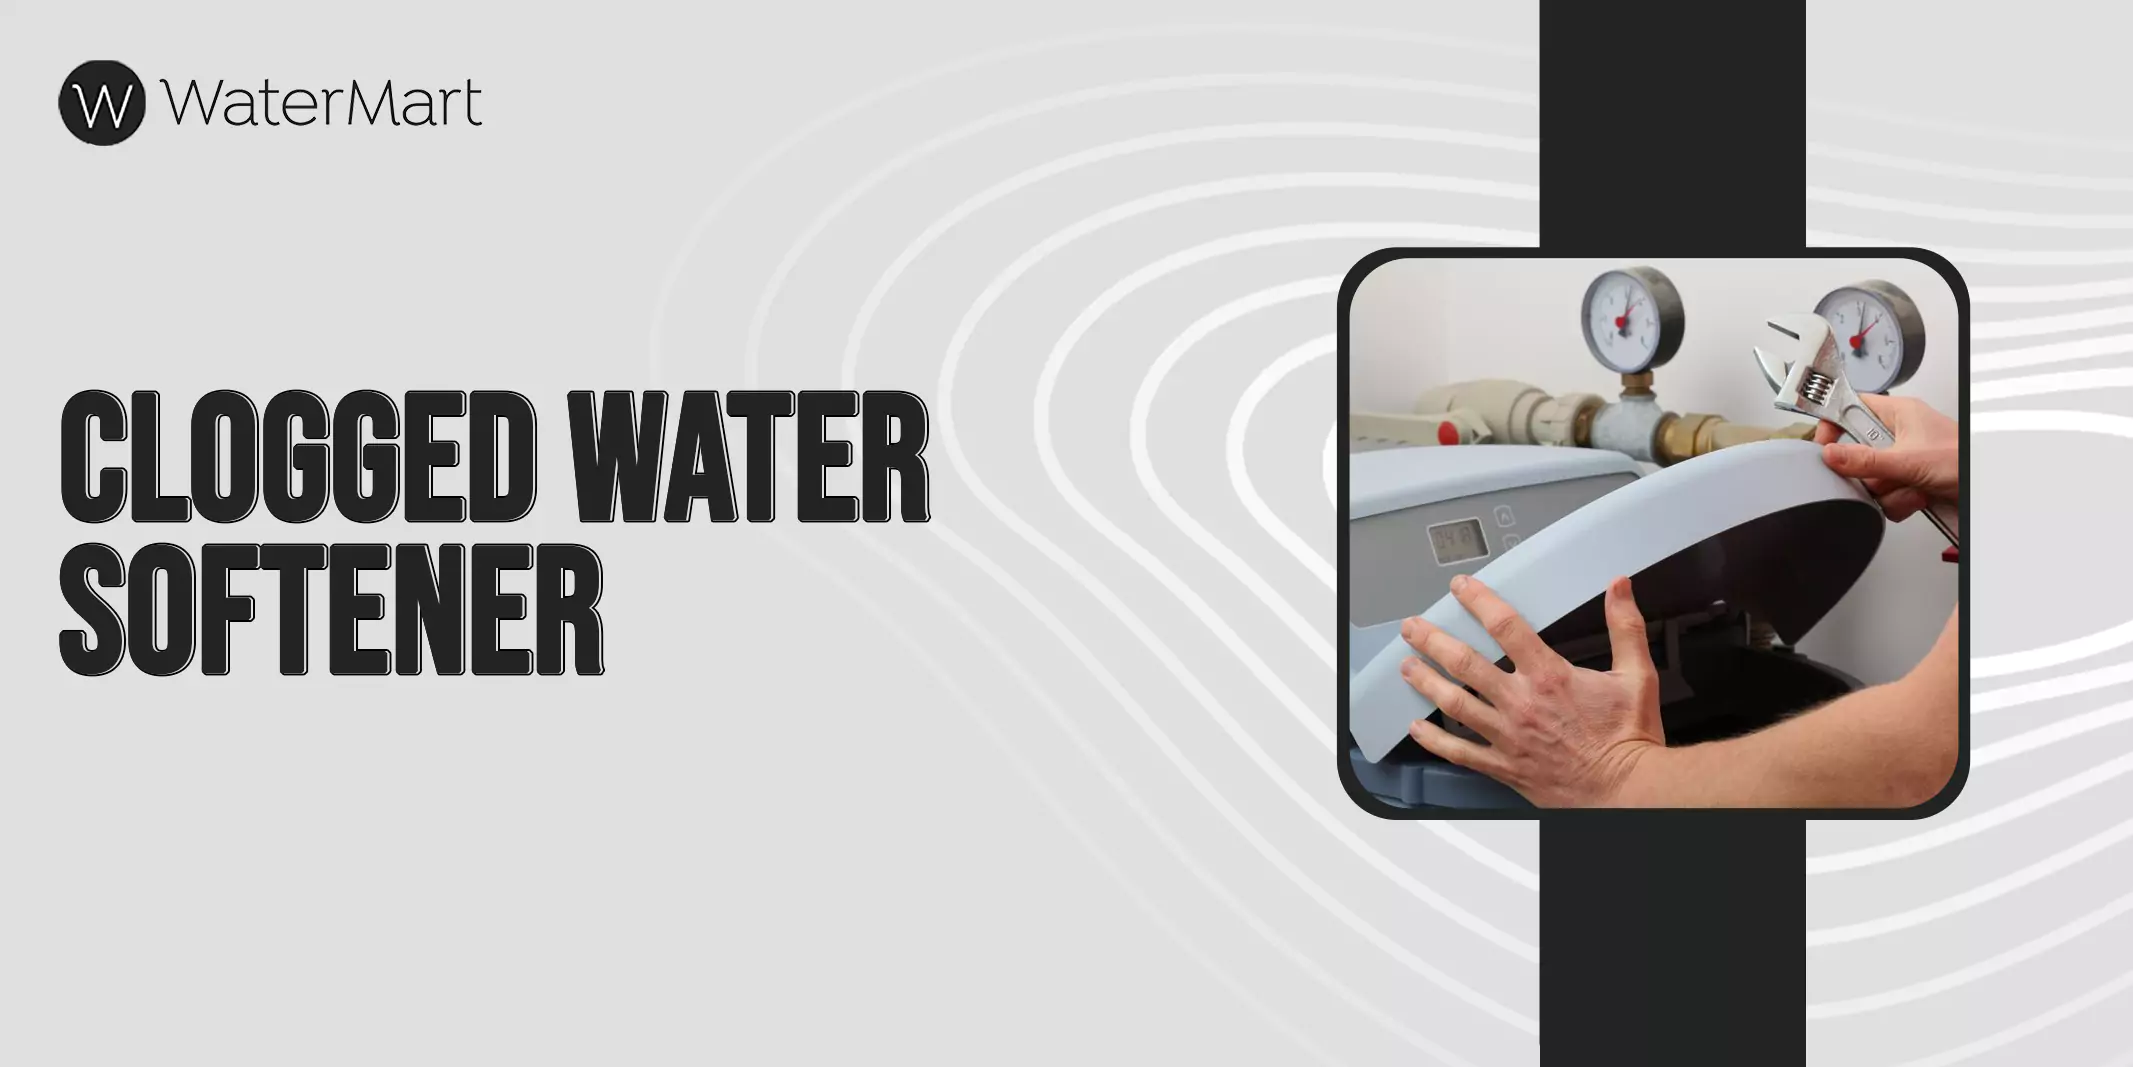
A clogged water softener is as good as a malfunctioning water softener. That’s because it reintroduces hard water into your home and also, the menace it brings, including soap scum, limescale buildup, and brittle, frizzy hair.
And worst of all, when you kneel down to check the brine tank, you find it overflowing with water. The high water level in your water softener indicates that your water softener is clogged. You may wonder, “Is my water softener clogged?” If yes, “What should you do?”
In this article, we’ll answer all of your questions related to a clogged water softener and the ways to deal with the clog.
Read on!

Water Softener Clogged? How To Diagnose The Exact Problem

Water Softener Clogged? How To Diagnose The Exact Problem


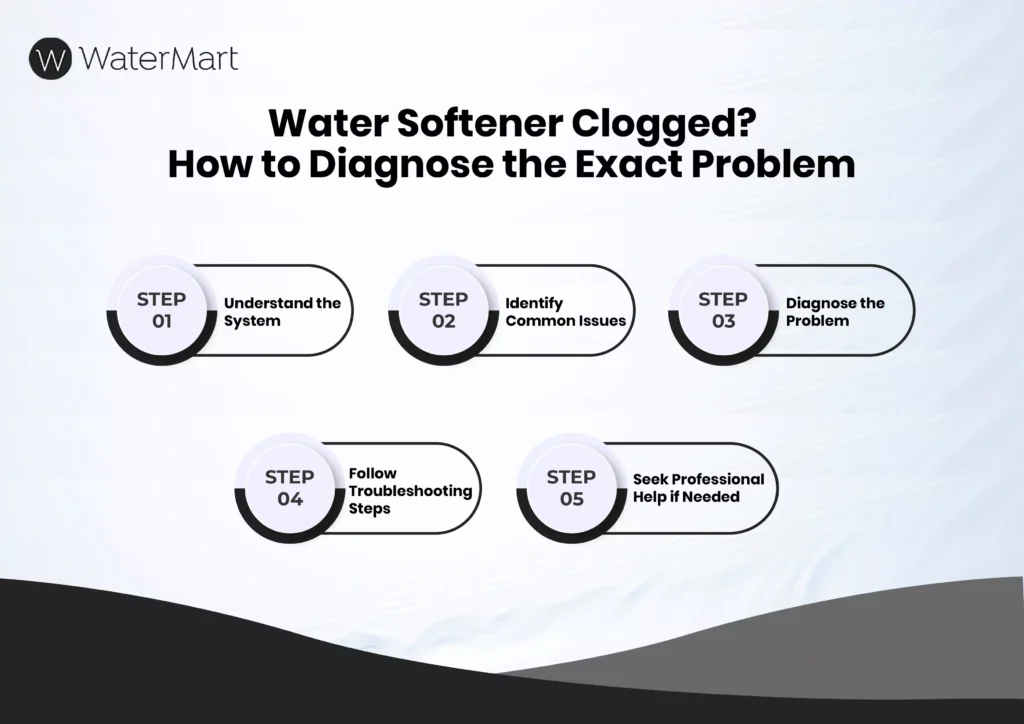
If you find out that your water softener is clogged, it’s time to dig deeper and find out the main cause behind the problem.

That’s because before starting to treat the problem, it’s important to diagnose it first. In order to do this, you need to understand how a water softener works. Know Suppose, your water softener is clogged because of the big chunks of salt in the brine tank. And instead of treating the salt bridge, we end up cleaning the mineral buildup. Therefore, it’s crucial to diagnose the exact problem to avoid any major inconvenience.

This is how to diagnose the exact problem:

  1. Take a flashlight and open up your brine tank.
  2. The water softener is usually clogged due to two main reasons: salt bridge and mineral buildup. Locate the main issue.
  3. Follow the troubleshooting steps in your user manual and enjoy your soft water.

If the problem persists, or if you do not have any plumbing experience, you can always schedule a call with the professionals.

How To Fix a Clogged Water Softener

How To Fix a Clogged Water Softener

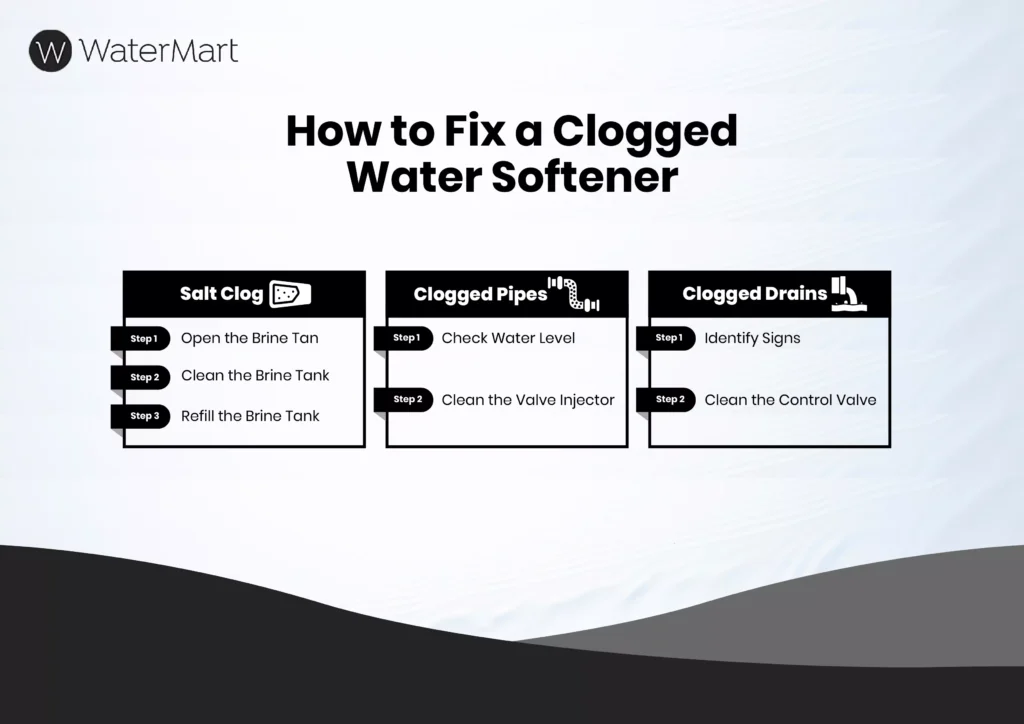
Facing hard water problems again? Don’t worry. It might be a minor salt clog that is affecting your softener’s efficiency.

Here’s what to do to fix your water softener.

Salt Clog

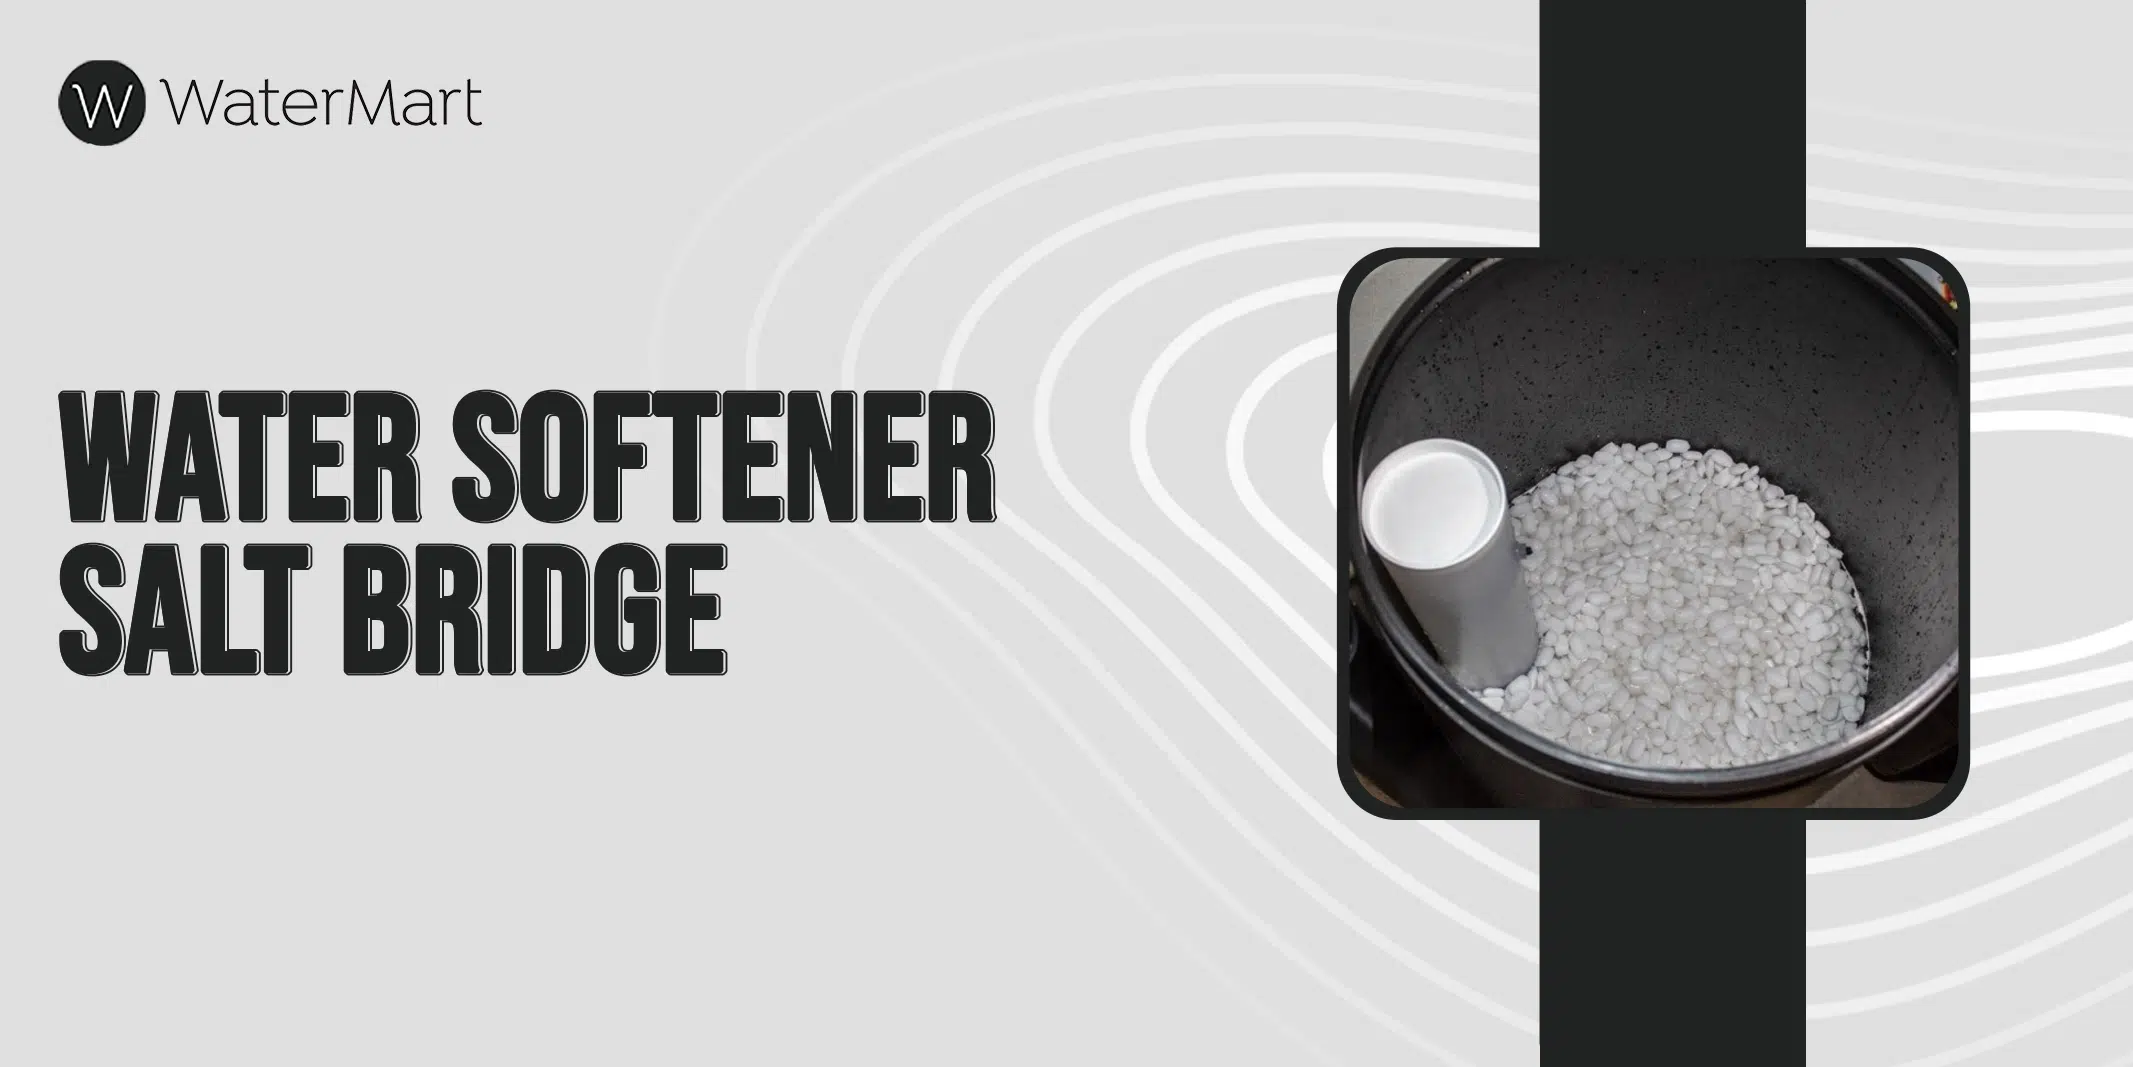
One of the most common types of water softener clogging is the salt clog. Since salt is the main ingredient in your brine tank to clean the resin beads, it can sometimes react with moisture and other conditions to form salt bridges.

If your water softener is clogged due to a salt bridge, you don’t need to call a professional.

Here’s a simple DIY process to help you unclog the softener.

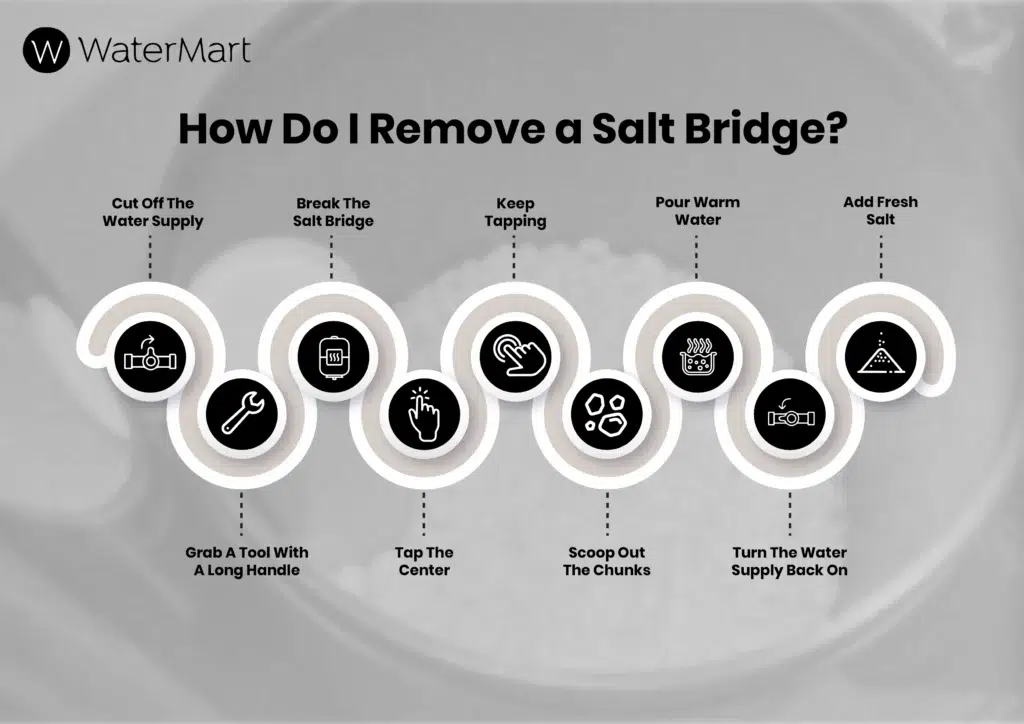
  1. Open your brine tank.
  2. Take a mop or a broom and break the salt bridge in the center.
  3. Scoop out the big and small chunks of salt to clean the brine tank.
  4. To thoroughly clean the tank, pour some hot water to dissolve the salt around the edges.
  5. Once the clog is gone, fill up the brine tank and add new salt pellets as per your user manual’s guidelines.

Clogged Pipes

If the pipes are clogged, the water level in your brine tank is usually higher than it should be.

To fix this, clean the valve injector to allow suction during the brine cycle for your regeneration process. Simply take the injector out and look through the hole. If you cannot see anything, take a pin or needle and clean it properly.

Clogged Drains

Clogged drains happen due to clogged control valves. It usually happens when you receive high iron levels at home.

One of the main signs your water softener is not working properly is an overflowing brine tank. If that occurs, clean the control valve and your water softener should be good to go!

Common Reasons And Solutions Of Clogged Water Softener

Common Reasons And Solutions Of Clogged Water Softener

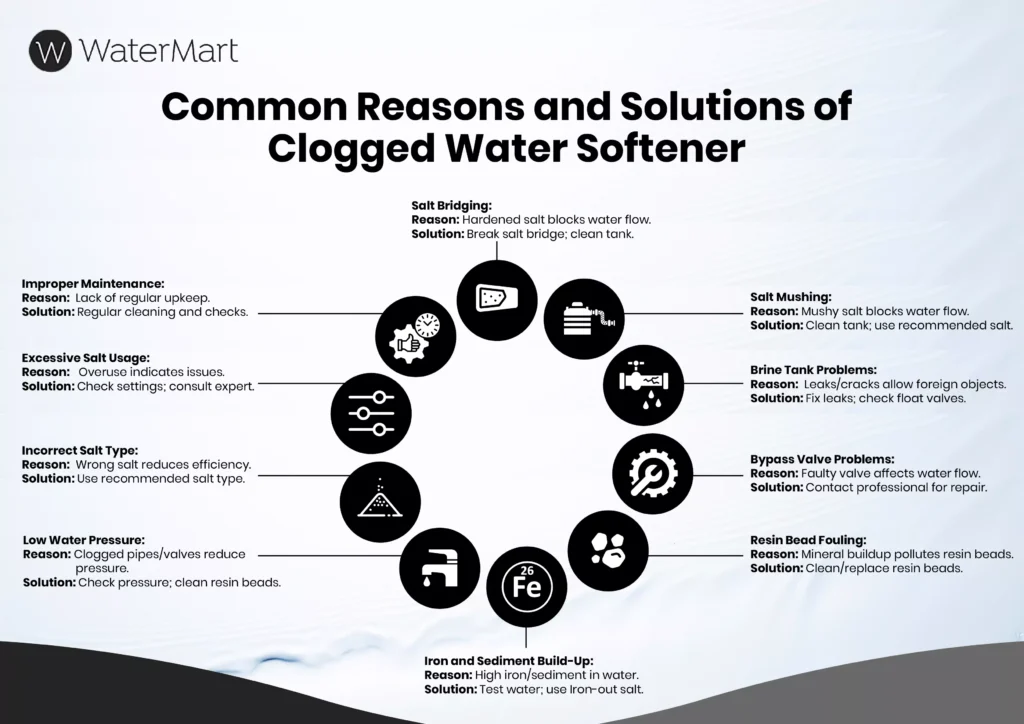
Sometimes, neither the salt clogs nor the drain and pipe clogs are the reasons. To thoroughly diagnose the problem, you must locate the source of the problem.

Here are a few reasons your water softening isn’t working properly due to clogging.

Salt Bridging

Salt bridging is the most common clogging issue in your water softener. It occurs when salt is hardened into a crystallized form in your brine tank. As a result, it blocks the water flow and proper dissolving of salt, which may lead to regeneration issues.

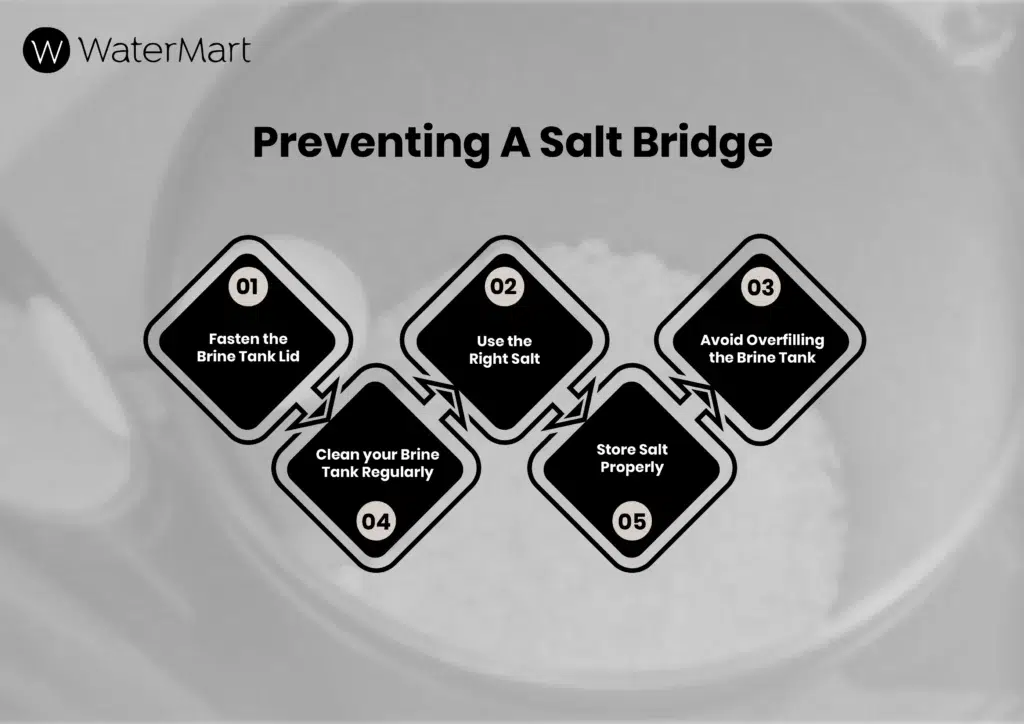
Treating salt bridging is easy. Just take any object with a long handle, such as a mop or a broom, and tap it gently on the hardened salt to break it into smaller pieces. Later, clean the tank and fill up your brine tank with recommended salt levels.

Salt Mushing

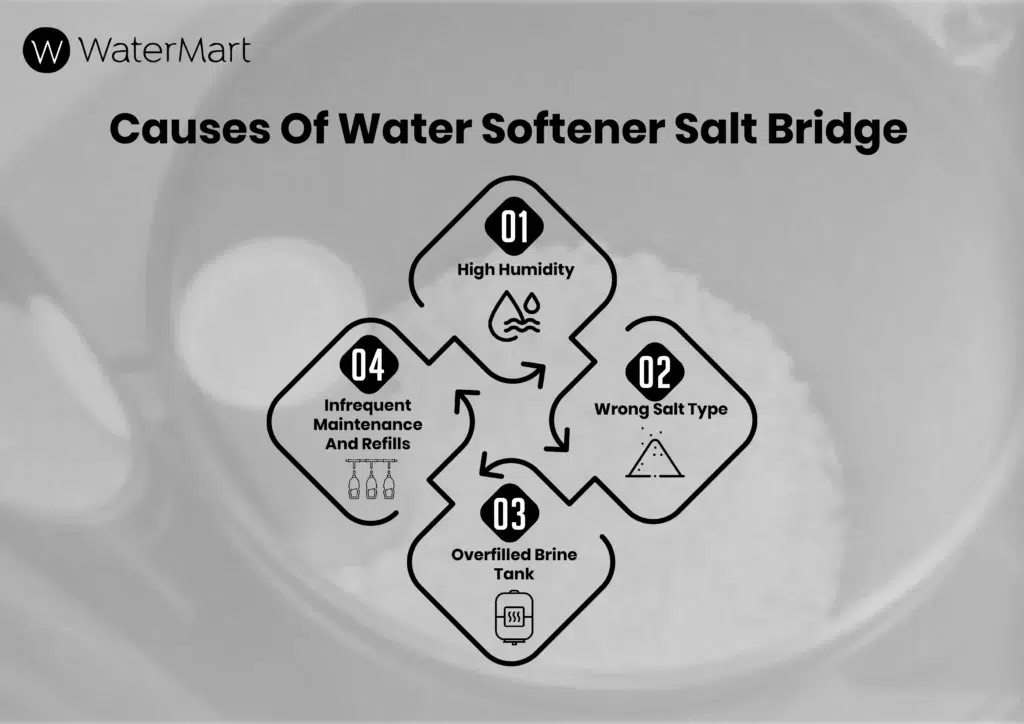
Just like salt bridging, the main culprit behind salt mushing is high humidity levels. Mushy salt creates a water flow blockage and hinders your regeneration process. The main causes of salt mushing are humidity, incorrect salt type, and low-quality salt that mess with your water softener.

To treat salt mushing, clean the brine tank and remove the sludge. Add the recommended amount of salt and store your salt in a cool dry place in an airtight container to prevent mushing.

Brine Tank Problems

Sometimes a leaking or cracked brine tank can cause havoc in your water softener. It allows foreign objects to enter the brine tank creating the clog.

Additionally, an overflowing brine tank may cause clogging due to malfunctioning float valves, incorrect salt type and dosage, and a simple clog in the drain.

To address this issue, check out the float valves and adjust the salt type and salt amount according to your water hardness levels. Also, check the drain line for potential blockages and clear them if necessary.

Please contact a professional if dismantling the components is involved, especially if you have no plumbing experience.

Bypass Valve Problems

If your bypass valve is faulty, the water doesn’t flow properly through, impacting the efficiency of your water softener. It’s recommended to contact professionals to diagnose any signs of bypass valve damage and provide solutions in terms of replacement or repair, if necessary.

Resin Bead Fouling

Resin beads are essential to keep your regeneration cycle running smoothly. However, over time, mineral build-up can pollute the resin beads with debris, dirt, and other contaminants and reduce their efficiency. It adversely affects the water quality and softening capacity of your softener.

To treat this issue, perform a resin bed cleaning treatment following the manual’s guidelines. Or best, contact a professional to clean and replace the beads so your water softener works efficiently.

Iron and Sediment Build-Up

If there’s staining around your softener and a rusty odor or taste, there are high levels of iron and sediment in your water.

To address this issue, test your water for iron and sediment levels and use Iron-out salt for optimal performance.

Low Water Pressure

Low water pressure is a result of clogged pipes, faulty pressure-reducing valves, or a faulty water softener. As a result, it hinders the regeneration cycle and leads to clogs.

To address these issues, check the main water pressure and after passing through the softener, if the pressure change is significant, clean the resin beads.
Though these fixes can be DIY-ed at home, it’s important to consult a water softening expert to rule out any potential risks and damages to your water softener.

Incorrect Salt Type

A water-softening salt should be of high purity and compatible with the make and model of your water softener.

To know the right type of salt, consult your user manual or ask a professional for assistance.

Using the wrong type and amount of salt can lead to many issues, including salt bridging, ineffective resin bead regeneration, and inefficient performance.

It’s recommended to use the right type of salt that is designed for water softeners and your hardness levels.

Excessive salt usage

If your water softener consumes more salt than it should, there could be an issue. Consult an expert and check out the brine tank float, salt dosage setting, or regeneration cycles to rule out the main problem.

Improper Maintenance

Like any other electrical appliance, regular maintenance and upkeep of your water softener is essential to keep it running smoothly.

You should:

  1. Clean the brine tank.
  2. Clean the resin bed and replace the resin beads when necessary
  3. Carry our thorough system checks at least every 3 months

What to Do If You Cannot Diagnose or Solve the Problem

Many times, even after several troubleshooting attempts, the clogs just won’t go away and the problem persists. Fret not!

Water softener is a tough nut to crack and there’s no shame in calling in a professional.

Qualified water softener technicians have the right skills, tools, and knowledge to do their job and tackle stubborn clogs, providing useful tips and ensuring your water softener is back in action.

Always remember a timely consultation with your professional water softener expert saves you tons of time, money, and unnecessary frustration.

Get Our Water Softener Cleaning and Maintenance Service Today

DIY fixes can be time-consuming and overwhelming. Worst of all, if they don’t work, you might need some other major fixes. Therefore, it’s important to trust the services of a professional specialist.

At Watermart, you get comprehensive water cleaning and maintenance services at your doorstep. Our team of certified experts is well-acquainted and informed to diagnose any clogs or system malfunctions—Whether it’s a routine salt bridge or a stubborn resin beads issue, Watermart got you all covered!

Besides water softener installation, we also provide routine maintenance checks to ensure optimal performance of your water softener weekly, monthly, or yearly. Our team of experts offers expert advice on how to choose the right water softener for your water needs with a steady installation process.

Don’t know whether you need a water softener or a water filtration system? Schedule our FREE water testing services to know now!

Know You Know How to Fix Clogged Water Softener

If your hard water is making a comeback ruthlessly, you probably have a clogged water softener. But before you start anything else, it’s important to carefully inspect the issue and diagnose the problem. Only then will you be able to find a viable solution?

Most of the time, there are two major causes of a clogged water softener:

  1. Salt bridge
  2. Mineral buildup

However, many other factors also contribute to a clogged water softener, such as salt mushing, bypass valve problems, low water pressure, and improper maintenance of your softener.

Whatever the cause is, you may try to fix an unclogged water softener following the DIY tips in this article. However, if something gets serious and the problem persists, feel free to call in professional water softener specialists.

FAQS

Q: Why is water not flowing through a water softener?

When the water isn’t flowing through the water softener, there might be clogs in the bypass valve, pipes, or control valves.

Q: Why is my water softener not draining?

If draining is the issue, check the drain line or inspect the control valve thoroughly for any clogs.

Q: Why is my water softener not filling with water?

Several factors contribute to your water softener not filling with water. For example, a closed shut-off valve, low water pressure, and a faulty timer.

Q: How do you know if you have a salt clog in your water softener?

One of the major signs of a salt clog is an overflowing brine tank. Also, a telltale sign of a salt clog in a water softener is hard, crystallized salt at the bottom of your brine tank.

Q: How to reset the water softener?

You can either restart your control unit or do a complete factory reset and erase all the settings to return to its default settings. Consult your user manual for resetting your water softener.

How To Fix A Water Softener Salt Bridge

If you feel your water softener isn’t working as it should or notice all your hard water signs returning, it’s time to check the brine tank for the water softener salt bridge.

But what is a salt bridge in a water softener?

Before diving into what a salt bridge in a water softener is, you should have complete knowledge about what a water softener system is and how it works.
Well, a salt bridge is a solid layer of salt that usually forms inside your brine tank due to high humidity, an overflowing brine tank, or infrequent maintenance. This layer of clumped salt, however, seems harmless but is the main culprit behind your water softener problems.

A salt bridge covers the entire width of your water softener tank and prevents water from dissolving the salt, resulting in ineffective regeneration cycles, and ultimately delivering hard water. Therefore, dealing with salt bridges before they cause havoc and mess with your whole water-softening system is crucial.

In this article, we’ll discuss the causes of salt bridging and ways to prevent them in the future.

Stay with us!

Causes Of Water Softener Salt Bridge

Causes Of Water Softener Salt Bridge

Salt bridges are not always your or your water softener’s fault. Sometimes, trivial things such as humidity can contribute to saltwater formation.

However, many other factors contribute to water softener bridging, including:

High Humidity

Humidity is the main culprit behind water softener bridging because moisture in the air causes the salt to clump in the brine tank before it dissolves in the water. If you’re located in a hot and humid climate, your softener is more prone to getting a salt bridge.

Wrong Salt Type

Not all salts are created for water softeners. Sometimes, using the wrong salt type in the water softener results in faster recrystallization and water softener salt bridge formation.

Note: Always choose the salt type recommended by your manufacturer. 

Overfilled Brine Tank

An overfilled brine tank or water softener full of water is one of the major causes of salt bridge formation because it hinders the salt dissolution process, promoting bridge formation.

Infrequent Maintenance and Refills

The infrequent cleaning and maintenance of your water softener may accumulate undissolved salt particles and impurities at the bottom of your tank, contributing to salt bridge formation.
Keep in mind that you need to maintain your water softener from time to time.

How Do I Know If I Have A Salt Bridge?

One of the most important signs you have a salt bridge is when your water begins to feel like it did before you installed your water softener. All the hard water signs return and you’re left with stubborn limescale stains, dry, brittle hair, and soiled laundry.

Additionally, one of the best ways to check if you have a salt bridge is to do a visual inspection and poke the salt with a stick or broom handle.

  1. Open the brine tank.
  2. Observe the insides of the tank. If you notice a hard crusted layer, you’ve salt bridge formation in the tank.
  3. Take a stick or broom handle and carefully produce the salt.
  4. If it feels solid and hard and doesn’t break easily, it’s now confirmed that you have a water-softener salt bridge.

How Do I Remove a Salt Bridge?

How Do I Remove a Salt Bridge

If you’re one of those DIY enthusiasts, you’re going to love this!

Investing in a water softener is one of the wisest decisions you’ll ever make, but handling a salt bridge can get challenging.

Here’s how to remove a salt bridge in your water softener.

  1. Cut off the water supply to your softener with a bypass valve of the incoming valve completely.
  2. Take any tool with a long handle, such as a broom or stick.
  3. Flip your tool upside down and try to break the salt bridge.
  4. Now, tap the center of the bridge with your tool. Make sure you crumble it because cracking will damage the tank.
  5. Keep tapping the salt until it breaks apart and falls into the tank.
  6. Once broken, scoop out the salt chunks.
  7. Pour warm water to dissolve any salt crystals clinging to the bottom of your tank.
  8. Turn the water supply back on and run a regeneration cycle until all the existing salt is cleared.
  9. Once your tank is cleared, add fresh salt into your brine tank for luxuriously soft water.

Is Your Salt at Fault?

Yes, the choice of your salt can impact the formation of salt bridges in your water softener.

It’s a known fact that not all salts are created equal. If you use table salt or salt with impurities, you’re more likely to face salt bridge issues in your water softener.

For water softeners, the recommended salt type should be high-purity salt especially designed for water softeners, such as evaporated salt or solar salt. These types of salts minimize the risk of salt bridge formation. Also, they dissolve easily in your brine tank, smoothing the water-softening process.

Additionally, it’s important to not overfill your tank with water because it largely affects the performance of your water softener. That’s because if you fill the brine tank to the brim, there’s less water surface area, taking longer to dissolve the salt in your tank. As a result, clumped, crystallized salt is formed. We recommend checking the user’s manual for tank filling to avoid inconvenience.

Furthermore, it’s crucial to choose the right type of salt as per your needs and the model of your water softener. Before choosing your perfect water softener salt, keep your water hardness levels, water consumption, and household size in mind.

Note: For long-lasting, consistent softening, consult your user manual for the manufacturer’s recommended salt type.

Preventing A Salt Bridge In The Future

Preventing A Salt Bridge

To keep your water softeners running smoothly without those pesky salt bridges, here are some steps you can take to prevent them from forming in the future.

  1. Always fasten the brine tank lid to keep your humidity levels at bay
  2. Use the right salt according to your user manual. Never use regular table salt or impure salt because they are more prone to crystallization and clumping.
  3. Avoid overfilling your brine tank to keep it working smoothly. Consult your manufacturer’s recommendations. Most softeners work the best with a ⅓ to 2.3 full range.
  4. Clean your brine tank regularly and remove any salt residue and mineral buildup. Follow the user manual for cleaning instructions.
  5. Store your water softener salt in a cool and dry place, ideally in an air-tight container to keep the moisture in control.

When to Call a Professional

Unlike most water softener problems, salt bridge softener can be tackled at home. However, sometimes, the DIY reaches its limit, and it’s now time to call a professional for help.

Here’s when it’s best to call the experts.

  1. If you follow everything as per the user manual to remove salt bridges, the issue persists. A professional may help to diagnose the problem and provide a viable solution.
  2. If you’re new to plumbing projects, your water softener may involve dismantling the components that can be too overwhelming for you. In such cases, an expert would help you handle the complex repairs and educate you with the necessary information.
  3. When you think your water softener issue is beyond a salt bridge or if you’ve already ruled out the salt bridge formation. It’s important to call a professional for a thorough inspection. They can also recommend the best solution as per your needs and requirements.

At Watermart, we not only provide the best water softeners but also provide water softening solutions, including professional maintenance and installation services. We have a team of qualified and trained professionals who can easily diagnose your problem and provide the necessary solutions to deliver optimal performance.

Contact us now to get a FREE quote.

Final Thoughts

Water softeners are excellent solutions to deal with hard water problems, but sometimes, they encounter their challenges. For example, salt bridge formations.

Salt bridges are crystallized buildups of salt in your water softener that impact its performance and deliver subpar results.

But now that you finally know the causes of salt bridges and ways to prevent them in the future, it’s easier to deal with them. All you have to do is:

  1. Secure the brine tank lid to keep humidity at bay
  2. Choose the right type of salt
  3. Avoid overfilling the tank
  4. Schedule periodic brine tank cleanings
  5. Keep your salt in a cool dry place

Above all, call in the professionals if the problem persists or if dismantling complex components is involved for better performance.

FAQS

How Often Should I Clean My Water Softener?

Clean your brine tank once a year to prevent salt bridges from forming. However, if you have high levels of iron or sediment, it’s recommended to clean your brine tank more often.

Test your water for FREE to check iron and sediment levels.

What Happens if I Don’t Remove a Water Softener Salt Bridge?

If the salt bridges are not removed, they will continue to grow. Over time, it becomes harder to remove the bridge and the efficiency of your water softener is compromised.

Can I Prevent Salt Bridges Completely?

Though it’s not possible to prevent salt ridges completely, you can reduce the risk by using high-quality salt, maintaining humidity levels, and cleaning your brine tank regularly.

How Often Should I Check the Salt Level in My Brine Tank?

You should check the salt level in your brine tank at least once a month.

How can you tell if you have a salt bridge?

The best way to check if you have a salt bridge is by inspecting it with a long sturdy handle.

11 Common Water Softener Installation Problems

We understand the charm of DIY projects and how they all make you feel so creative while saving you money and providing a sense of accomplishment.

However, installing a water softener at home can lead to more frustration than fulfillment. Suppose, you’ve brought your fancy new water softener home and DIY-ed it with the manual as your sole guide. You follow all the steps correctly, but still, the next morning, there’s a salty surprise—an overflowing brine tank.

In this article, we’ll discuss 11 common water softener installation problems and ways to prevent them.

Let’s go!

What Are Common Water Softener Installation Problems?

What Are Common Water Softener Installation Problems?

Water softeners are a true lifesaver for people living in hard water regions, but proper installation of the water softener is essential for its efficiency and performance.

Here are a few factors that contribute to improper water softener installation.

HINT: It’s not always the fault of your water softener installer.

Improper Water Softener Sizing

One of the few things we recommend considering before buying a new water softener is the size of your household. If you choose a water softener too small for your household, it will fail to remove hardness.

Similarly, if you choose a water softener too big for your household, it would be inefficient and wasteful. You should be very careful when choosing a water softener system.

Incorrect Placement

If you place your water softener in a compact place where there is little room for drainage, it will greatly impact its functionality.

Tip: Always keep your water softeners in an open space. If you live in a small apartment, it’s advisable to get wall-mounted ones that occupy little space.

Using Incorrect Pipe Sizes

Sometimes, the pipes of your water softening system are too small, they restrict water flow and cannot handle the pressure of the system. As a result, they cause water softener installation problems and hinder the working of your softening system.

Connecting Pips Incorrectly

Check your pipes for leakage or improper connectivity to prevent water waste and avoid risking damage to your property.

Inadequate Drainage

Sometimes, the drainage issues will cause problems draining the wastewater properly. As a result, your softener, despite being installed properly, won’t work.

Bypass Valve Issues

A bypass valve that is malfunctioning or installed incorrectly will prevent the softened water from reaching your faucets. As a result, you’ll get hard water in your faucets instead. A bypass valve that is malfunctioning or installed incorrectly will prevent the softened water from reaching your faucets. As a result, you’ll get hard water in your faucets instead.

Electrical Supply Problems

Make sure the electrical supply is proper and stable for your water softener to work efficiently.

Improperly Connected Brine Line

The regeneration cycle is the most crucial for your water softener to work efficiently. If you connect the brine line improperly, the salt will not be available for the regeneration cycle. Therefore, your water softener will not carry out the regeneration process like it should, making it ineffective.

Using the Wrong Type Of Salt

Every water softener comes with a recommended salt type in their user manual. Therefore, it’s always recommended to use the right type of salt for your softener. Using the wrong type will lead to system clogging and ineffective softening solutions.

Incorrect Programming

It’s advisable to program your water softener for optimal performance based on your water hardness levels. These programming methods vary according to the make and model of your water softener.

Find the hardness setting of your water softener and adjust it to match the level of your water hardness.

Note: If you don’t know your water hardness levels, schedule a FREE water test!

Incorrect Venting

The venting system is used for air intake and pressure relief. Therefore, improper venting may lead to some serious problems, such as reduced efficiency of your softening system, component damage, and other safety hazards. For instance, a ruptured tank.

Make sure to choose the correct venting requirements based on the model of your water softener and local plumbing codes.

The Disadvantages Of Incorrect Water Softener Installation

The Disadvantages Of Incorrect Water Softener Installation

Water softeners are a blessing in disguise for people living in hard water regions, such as Canada. However, an incorrectly installed water softener can turn everything upside down.

Here are a few serious disadvantages of incorrect water softener installation.

System Malfunction

Incorrect water softener installation can lead to system malfunction in many ways.

  1. It can cause electrical issues with faulty wirings and improper grounding, damaging the internal components of your softener.
  2. It can cause water pressure problems either by hindering the regeneration process or preventing water from reaching the softener because of clogged pipes or leaking connections.
  3. Component damage is one other factor that may cause malfunction and leaks
  4. Programming errors through incorrect settings and incomplete settings during the initial programming leaves your water softener incapable of working properly
  5. Using the wrong components or wrong salt type can lead to malfunction and hinder the softener’s ability to turn your hard water into soft.

Inefficient Water Softening

Inefficient water softening occurs when your water softener is running but not working properly to remove hardness. This may be due to leaky connections or incorrect settings of your softener.

Water Pressure Issues

Since water softeners are plumbed into your main line, incorrect installation may affect its performance and disrupt the overall water pressure in your home. It may lead to a restricted water flow to your faucets and showerheads. Also, it causes many internal issues, such as a clogged resin bed that restricts water flow within the softener.

Water Leaks

Improper water softener installation in the form of loose connections or improper bypass valve installation may result in water leaks and water waste that ultimately damages your property.

Salt Overuse Or Underuse

A water softener when installed incorrectly messes up your salt usage while initiating unnecessary regeneration cycles. As a result, too much salt is wasted, which can also form salt bridges. Similarly, improper installation may leave the bypass valve open, reducing your salt usage but leaving you with hard water.

Increased Water Usage

An improperly installed water softener goes through inefficient regeneration cycles that lead to water waste, which is hazardous to our environment. Additionally, increased water usage adds up to your overall monthly expenses of water softener salt and utility bills.

Electrical Hazards

Faulty wirings and improper installation of water softener components can be hazardous to you and your loved ones and pose a safety risk.

Drainage Problems

The improper installation of a water softener can result in drainage problems and create unexpected clogging issues, ultimately preventing your softener from working effectively.

Voided Warranty

If you go for DIY water softener installation or choose a local plumber to install your water softener, most manufacturers void warranties.

Increased Maintenance Needs

The quick fixes and re-installation of an already poorly installed softener can be more complex, expensive, and time-consuming.

Potential Health Risks

Inaccurately installed water softeners lead to pressure imbalances, contaminating your water supply. This may cause potential health risks.

System Longevity

The lifespan of your water softener depends largely on its installation. An incorrectly installed water softener has a lower lifespan, leading to premature replacement and maintenance.

Incompatibility Issues (With Existing Plumbing System)

Incompatibility issues in your water softener installation lead to many problems, such as leaks and damages, system inefficiency, and other safety concerns.

Getting Rid of Water Softener Installation Problems

Now that you know that installing a water softener by yourself or your local plumber can turn into a frustrating nightmare, it’s crucial to understand the importance of professional water softener specialists.

Not only will a professional install your softening system correctly, but they will also guide you through the process and educate you with the tips and tricks to keep your water softener working efficiently for years to come, leaving you with pure, clean, soft drinking water.

Get In Touch with Expert Water Softener Installers

Hard water can be an unfortunate menace to your physical and mental health. Also, it plagues your home with stubborn soap scum, and mineral buildup that affect your everyday life.

People living in the hard water regions, including Canada, will agree:

The most viable solution to hard water problems is installing a water softener by a professional company.

At Watermart, we provide hassle-free water softener installation tailored to your needs and requirements. Our team of expert and licensed water softener installers test your water for hardness levels and recommend the most suitable solution for your water needs based on your household size, hardness levels, and water consumption.

From detecting hard water to installing a perfect water softener and navigating the plumbing, we’ve got you all covered!

We provide:

✅ 100% Guaranteed leak-free installation of your water softener
✅ Proper configuration of your softener for optimal performance
✅ Complete peace of mind, backed up by a hassle-free warranty

When it comes to health, never settle for less, and contact Watermart for all of your water needs.

Now You Know: Water Softener Installation Problems

Make the right choice by investing in a water softener. Make the best choice by hiring a professional to do the job.

While your local plumbers and DIY projects may save you a few bucks, it adds to more frustration and headaches. Electronic appliances, as sensitive as a water softener, cannot handle a minor mishap during installation and may cause major problems later. For example, leaky connections and a completely dysfunctional softening system that does more harm than good.

Hiring a professional is a smarter choice because:

  1. They are experienced and have the knowledge to ensure your water softener is installed correctly.
  2. They don’t just install the system but guide you through the complete process and recommend the right softener for you.
  3. They configure your softener for your water hardness levels and ensure you get maximum results.

The best of all? Many water-softening solution companies offer a hassle-free warranty that gives you complete peace of mind and comfort.

FAQS

Is it Easy to Install a Water Softener?

It depends on your level of expertise. However, for most people, it is not recommended to install a water softener by yourself.

What Happens if a Water Softener is Installed Backward?

If the water softener is installed backward, it can lead to many problems, such as resin bed damage, contaminated water, and ineffective brine solution.

Why is My Brand-New Water Softener not Working?

There may be many reasons for your brand-new water softener to not work. Possible causes are leaks, valve malfunctions, ineffective regeneration cycle, and other internal damage. It’s recommended to call a professional to diagnose the problem.

What Are the Cons of Installing a Water Softener?

A water softener is not the best substitute for filtration systems as it doesn’t remove lead and heavy metals.

How Many Hours Does it Take to Install a Water Softener?

For a professional to install your water softening system correctly, it may take between two to four hours.

How Long Does it Take to Eee the Effects of a Water Softener?

You may notice effective results of a water softener in three to seven days.

How Hard is it to Install a Water Softener?

Water softener installation is a straightforward process. However, for most people, it can be very challenging to deal with the valves and the pipes. Therefore, it’s recommended to leave the water softener installation process to the professionals only.


How Long Do Under-Sink Water Filters Last? Longevity and Replacement Tips

For many homeowners, under-sink water filters are a convenient solution. These filters remove harmful contaminants from the water and help improve its taste. You can easily install them under your sink without taking up counter space. Their discreet placement and efficient filtration make them a popular choice.
But how long do under-sink water filters last? What factors affect their lifespan? And how often should you change them? These are important questions every homeowner should ask.
This article will answer these questions and more. Let’s explore how under-sink filters work, their lifespan, and how to maintain them for the best water quality.

How To Know When Water Filter Needs Replacing

Signs Your Under-Sink Water Filter Needs Help

How often to replace the under-sink water filter? As often as the following signs become visible in your filter:

Decreased Water Flow

If the water slows to a trickle, your filter might be clogged with sediment and debris. Replace the filter to restore normal water flow and keep your system running smoothly. Regular maintenance prevents clogs and ensures consistent water pressure.

Bad Taste or Odor

If your water starts tasting off or smells weird, it’s a clear sign your filter isn’t removing contaminants. An old filter can’t clean the water effectively. Replacing the filter should restore the clean, fresh taste of your water (so trust your senses).

Cloudy or Discolored Water

Seeing cloudy or discolored water from your tap can indicate a clogged filter. It suggests the filter is full of trapped particles and can’t clean the water anymore. Swap out the filter to ensure your water is clear and safe to drink.

Strange Noises

Hearing gurgling or other odd noises from your filter system might indicate buildup or trapped air. Check for loose fittings and consider replacing the filter. Quiet operation should return once the system is cleared and the filter is working properly.

Filter Indicator Light

If your filter system has an indicator light, pay attention to it. When the light turns on, it signals the need for a replacement. It’s an easy and reliable way to track your filter’s lifespan and ensure your water remains clean.

Visible Sediment in Water

Finding particles in your filtered water suggests the filter is no longer catching contaminants effectively. Replace the filter to keep your water free of visible sediment. Your water should be crystal clear, not murky.

Leaks or Drips

Leaks or drips under your sink can point to a worn-out filter or poor connections. Tighten any loose parts and see if replacing the filter solves the issue. Keeping your cabinet area dry is crucial to prevent water damage and maintain filter efficiency.

Unusual Taste of Ice Cubes

If your ice cubes taste strange, your filter might not be cleaning the water fully. This indicates the need for a filter replacement. Changing the filter should make your ice taste clean and fresh again.

Filter Lifespan Exceeded

Filters have a set lifespan, and using them beyond this point reduces their effectiveness. Regularly check the recommended replacement schedule and stick to it. Consistent maintenance leads to better water quality and system performance.

Lifespan of Under-Sink Water Filter Components

An under-sink filtration system has different parts that each have their own lifespan. Knowing how long they’ll last can help you understand how often you should change the water filter cartridge. Here’s a look at the different components and their under-sink water filter lifespan.

Filter Cartridge

The filter cartridge is the main component that traps contaminants. Over time, it gets clogged and loses efficiency. Typically, these need changing every 6 to 12 months. Regular replacement ensures you always have clean water flowing from your tap.

Filter Housing

Filter housing holds the cartridges in place and protects them from damage. While durable, it should be inspected regularly for cracks or leaks. It generally lasts several years but should be replaced if any damage is noticed.

Faucet

The water faucet attached to your under-sink system dispenses the filtered water. It can last many years with proper care. However, if it starts leaking or shows signs of wear, it’s time to replace it to maintain water quality and flow.

TDS (Total Dissolved Solids) Meter

A TDS meter measures the number of dissolved solids in your water. It helps monitor filter effectiveness. Typically, these meters have a long lifespan but should be recalibrated regularly to ensure accurate readings.

Filter Indicator Light

Many modern systems have an indicator light to signal when it’s time to replace the filter. Pay attention to this light—when it turns on, it’s time to swap out the old filter to keep your water clean and safe.

Tips to Prolong The Life of Your Under-Sink Water Filter

Tips to Prolong the Life of Your Under-Sink

Your under-sink filter system might work fine now, but taking some steps can help it last longer. Here are measures to ensure your filter system stays efficient and durable.

Proper Installation

Ensure your under-sink filter is installed correctly. Installing an under-sink water filter requires proper knowledge. Incorrect installation can lead to leaks and poor performance. Follow the manufacturer’s guidelines or hire a professional for a secure and efficient setup.

Use Genuine Parts

Always use genuine parts for replacements. Using off-brand or incompatible parts can harm your system and reduce its effectiveness. Genuine parts ensure compatibility and longevity, providing the best performance and extending the system’s life.

Clean Water Inlet

Regularly clean the water inlet to prevent blockages. Sediment and debris can accumulate, reducing water flow and filter efficiency. Cleaning inlets helps your system function smoothly while presenting unnecessary strain on the filter.

Regular Maintenance

Perform regular maintenance on your system. Check for any signs of wear and tear and replace parts as needed. Regular upkeep can prevent major issues and extend the life of your filter.

Avoid Freezing

Ensure your filter system is protected from freezing temperatures. Freezing can cause cracks and damage the internal components. Keep it in a controlled environment to prevent costly repairs and maintain functionality.

Use Soft Water for Cleaning

When cleaning your filter system, use soft water. Hard water can leave mineral deposits that clog the system. Using soft water during cleaning prevents mineral buildup and extends the life of your filter.

Check Water Pressure

Monitor the water pressure regularly. High or low pressure can affect the system’s performance and lead to damage. Ensure the pressure is within the recommended range for your filter system

Inspect for Leaks

Leaks can cause water damage and reduce the system’s effectiveness. Early leak detection and repair are crucial for preventing water damage and ensuring filter efficiency. Promptly fix any leaks to maintain optimal performance.

Must-Have Features for Under-Sink Water Filters

Must-Have Features for Under-Sink Water Filters

  • Effective filtration: Your filter should remove harmful contaminants and improve the water’s taste. Look for systems that tackle chlorine, lead, and other pollutants. To find out how hard your water is, schedule a free water test at WaterMart.
  • Multiple-stage filtration: Multiple stages mean better filtration. Systems with sediment, carbon, and other filters remove different contaminants. Each stage handles a specific type of impurity, and more stages equal cleaner water.
  • Long-Lasting filters: Choose a whole water filtration system with durable filters that you don’t need to change frequently. Quality filters can keep your water clean for months.
  • Compact design: The space beneath the sink is limited, so choose a system that doesn’t take up too much room. A sleek design makes installation easier and keeps your kitchen organized.
    Easy installation: Look for filters that are simple to install. No need for professional help. Clear instructions and user-friendly parts should make setup a breeze.
  • NSF/ANSI certification: NSF certification ensures your filter meets safety standards. It’s a mark of quality and trust. Always check for these certifications when buying.
  • Quick dispensing: Quick dispensing systems provide fast access to filtered water. No long waits for a glass of clean water. Efficient flow rates allow you to get your water quickly and easily.

Revamp Your Under-Sink Filtration System Today

Many under-sink filtration systems come with poorly selected materials that wear out quickly. And many homeowners don’t think about the features that can make a big difference. WaterMart offers high-quality under-sink filters that last longer and perform better.
Our systems filter out harmful contaminants so that your drinking water is safe and clean. With multi stages of filtration, each one targets specific impurities to ensure purity. Compact design keeps your kitchen tidy, and installation is easy with clear instructions. Consider upgrading with Watermart and experience the difference in water quality and convenience.

Now You Know: How Long Do Under Sink Water Filters Last?

Under-sink water filters provide clean, safe water for drinking and cooking. Regular maintenance and timely replacements ensure they work efficiently. Use the warning signs we’ve discussed to catch issues early, and then arrange an under-sink filtering system with must-have features to keep your water fresh and pure.

FAQs

Do under-sink water filters work?

Yes, under-sink water filters work well. They remove contaminants and improve taste. Easy to install and maintain, they fit right under your sink for convenience.

How often do you change the water filter cartridge?

Change your water filter cartridge every six months. If your water has lots of sediment, you might need to do it more often. Regular changes keep your water fresh and clean.

How long do water filter cartridges last?

Water filter cartridges usually last around six months. Check the manufacturer’s guidelines for your specific filter. If your water quality is poor, you might need to replace it sooner.

Benefits Of Reverse Osmosis System

Big cities like Toronto rely heavily on reverse osmosis systems because RO systems remove 99% of contaminants at an unbelievably lower cost. Therefore, it’s the best investment for safe and pure drinking water in towns and cities.

However, when it comes to the reverse osmosis system, there are contradictory views regarding the safety of its use.

Like any other water treatment system, there are both pros and cons of reverse osmosis water systems that we will discuss later in the article today.

Read on!

What Is Reverse Osmosis Filtration?

Reverse osmosis water filtration systems have been around for over 300 years now. It’s one of the most effective ways to filter water without using chemical or carbon filtration systems.

RO filtration systems use a semi-permeable membrane to extract the contaminants, including chlorine, lead, and arsenic from your tap water, leaving behind clean water safe for drinking, cooking, and cleaning purposes.

Benefits of Reverse Osmosis Water Filtration

As opposed to other water filtration methods, a reverse osmosis system relies on a pressure system that filters out all the contaminants, saving you energy.

Some other benefits include:

Reverse Osmosis Filters Nearly All Contaminants

According to the EPA, Many high-efficiency reverse osmosis systems remove around 99% of contaminants and other harmful toxins, such as Fluoride, Arsenic, Chlorine, and lead.

This is more than any water filtration system in the market, leaving consumers safe and pure drinking water.

For example, the reverse osmosis systems at Watermart remove contaminants and other harmful substances from your tap water, including pesticides, hormones, pharmaceuticals, cosmetics, hexavalent, chromium, radium, and barium.

Environment Friendly And Safer Than Bottled Water

Since RO water works on a pressure system, it requires no electricity and saves energy costs.

Furthermore, in regions where consumers rely on plastic water bottles for safe drinking water, the RO water system reduces plastic waste and eliminates the need for constant water bottle purchases.

Overall, using RO water saves energy, and the environment by reducing the use of plastic bottled water.

Mineral-Less Water May Be Necessary For Certain Uses

RO water removes the most harmful and beneficial minerals from your tap water. While the deficiency of such minerals may cause problems and decrease water pH, it can be beneficial in some cases.

For example, in kidney dialysis, RO water better controls patients’ electrolyte balance. Also, in many laboratory applications, RO water comes in handy to prepare solutions for cell cultures.

Improved Taste And On-Demand Supply

According to the National Library of Medicine, 16% of the adult population in the USA enjoy drinking RO water followed by coffee and tea.

The fact that RO water removes 99% of the contaminants and minerals from your tap water affects the overall taste and odor of water and other beverages. In general, RO water is free from bitterness and metallic taste and the lack of minerals allows the true essence and flavors of the food and beverages, including coffee and tea.

As far as the supply is concerned, many RO water systems can be installed under your sink for the constant supply of water 24/7. It also helps to eliminate the need for plastic bottles and reduce plastic waste.

Save Money With A Reverse Osmosis System

RO water not only helps to save the costs of bottled water but also extends the lifespan of your appliances.

Hard water or water with a lot of contaminants and toxins can potentially harm your appliances and affect their lifespan adversely. The lower mineral content in RO water prevents mineral buildup in your appliances to keep them running for long.

Reverse Osmosis Is More Convenient Than Pitchers

As compared to water filter pitchers, reverse osmosis filtration systems are more convenient because they provide:

  1. Constant supply of water
  2. Automatic filtration process
  3. Faster filtration without waiting for the slow drip of a pitcher filter

Reverse Osmosis Provides Better Water For Cooking

Since RO water removes 99% of the contaminants and minerals, it’s ideal for cooking. That’s because it provides enhanced taste, clearer appearance, and consistent mineral content, especially for baking.

Cons of Using Reverse Osmosis Water Filters

Like any other water filtration system, there are some cons of using RO water as well.

Wastes More Water

RO water filtration systems use three times more water than they treat, producing a lot of wastewater.

To help mitigate this issue, choose an RO water system that is highly efficient, such as Watermart.

Removes Healthy Minerals & Decreases pH

While RO water removes a lot of harmful bacteria and minerals from your water, it also eliminates the beneficial ones, such as calcium, magnesium, and potassium.

The absence of mineral content in RO water makes it slightly acidic.

Costly Installation and Maintenance

RO water provides immense benefits, however, it comes with a hefty cost compared to other filtration systems.

They are not only expensive to install, but the ongoing costs of RO water systems are also too high.

Watermart offers RO water systems for rent or purchase for your convenience.

Pressure Drops

Clogged filters, clogged membranes, leaks, and other faulty components may lead to pressure drop. Pressure drops may affect the overall performance of your RO system adversely.

Is Reverse Osmosis Water Good for Health?

Yes, drinking RO water is good for health. However, it has its own set of disadvantages.

One of the biggest advantages of RO water is its lack of minerals, impurities, and contaminants, including harmful bacteria, viruses, chemicals, and heavy metals. As a result, RO water is especially beneficial for people with kidney issues.

The absence of lead, chlorine, and other harmful substances improves your blood pressure and circulation and reduces the risk of cardiovascular diseases.

Furthermore, drinking RO water can result in shiny, beautiful, and smooth hair with healthy and stronger nails.

How Much Does an RO Water System Cost?

The average RO system cost depends on many factors, including the type of RO system. Usually, small, under-sink water filters cost less, and large setups, such as a whole-house water filter system cost more.

On average, the cost of an RO water system starts from $400 to $5000.

At Watermart, we offer reverse osmosis water filtration systems for rent or purchase.

Is a Whole-House Reverse Osmosis System Necessary?

The importance of a whole house reverse osmosis system depends on many things, such as the quality of your water, your daily water consumption, and water needs.

The whole house reverse osmosis system is ideal for you if you have severe water contamination and hard water issues.

However, if you have safe drinking water free from contaminants and other harmful toxins or live in areas with water restrictions, the whole house RO system is not the right choice.

We recommend testing your water for contaminants to decide whether you need a whole-house water filter system.

Watermart provides advanced technology whole house RO filter systems that remove contaminants and provide safe drinking water for your loved ones.

Conclusion

Reverse osmosis systems are one of the most effective water treatment methods to remove 99% of contaminants from your tap water. The effectiveness in removing impurities of tap water has no match for other water filtration methods. Besides removing contaminants, RO water offers improved taste and odor and reduces the need for plastic bottles, promoting sustainability.

However, like any other water filtration method, there are some disadvantages of RO water, including the removal of beneficial minerals and water waste. Also, the initial RO installation cost and ongoing costs are much higher than other counterparts.

All in all, RO water is an ideal choice for you if:

  1. You want pure drinking water with little to no contaminants and minerals
  2. You suffer from kidney issues
  3. Installation and ongoing costs are not an issue for you
  4. You take multivitamins and mineral supplements to make up for the lack of minerals.

FAQS

Is RO Water Good for Health?

Mostly, yes; RO water is safe to drink as it removes 99% of contaminants. However, people with special health concerns should consult a doctor before investing in a reverse osmosis water filter system.

What’s better; a Whole-House RO Water System or an Under-the-Sink RO Water System?

It depends on your needs and water quality. If you want pure water for drinking or cooking purposes only, an under-the-sink filter system is ideal and cost-friendly.

However, if you want pure water in your whole house, a whole-house water system is good for you. Nonetheless, whole-house water systems are costlier than under-sink water filter systems.

GET A FREE WATER CONSULTATION

Save $100 – On Every New Water Filter System