Water Softener Drain Line Installation | Step-by-Step Process
Hard water can make life much harder, which is why so many Canadian homeowners are getting water softeners for their personal comfort and extended appliance life. A water softener exchanges hardness minerals (calcium or magnesium ions) in your water with softer ones (sodium or potassium ions), with the water softener drain line being an important component of the system.
In this article, we’ll discuss the purpose of the drain line, the difference between a drain line and a brine tank line, the water softener drain line installation process, and common issues associated with it.
Key Takeaways
A water softener drain line installation includes selecting a proper drain location, measuring and routing the tubing, and making sure there’s a downward slope throughout the line. There should also be an air gap and a secure connection to your existing plumbing system. Overall, the system should be leak-free with code-compliant connections to ensure optimal performance and safe drainage.
What is a Water Softener Drain Line?
A water softener drain line is a flexible tube or pipe that carries waste brine (saltwater) and dissolved minerals away from the water softener during its regeneration cycle.
Water softeners use resin beads to swap hardness minerals such as calcium and magnesium in the water with sodium or potassium ions. Over time, these minerals accumulate on the resin and reduce its effectiveness. To restore the resin, the system performs a regeneration cycle, which cleans and recharges the beads using a salt brine solution.
During regeneration, the system produces wastewater that must be discharged from the unit. This wastewater generally includes:
- Backwash water, which rinses the resin bed and removes trapped sediments and minerals.
- Brine solution, which flushes salt through the resin to recharge it.
- Rinse water, which washes away remaining salt and mineral residues after regeneration.
Because regeneration releases a significant amount of wastewater, it must be drained efficiently. The drain line should have the correct diameter, proper slope, and airflow protection to ensure smooth discharge. If the drain line is installed incorrectly, it can cause backflow, slow drainage, and reduced water softener performance.
Difference Between Water Softener Drain Line & Brine Tank Drain Line
The water softener drain line and the brine tank drain line have different functions and purposes. The drain line for the water softener takes water from the control valve for the resin tank, removing wastewater from the regeneration process. It’s designed to carry away a large water volume very quickly and is usually connected to a floor drain, utility sink, or another main household drain.
The brine tank drain line is also known as the overflow line. It’s a safety feature that connects to the brine tank and catches any overflow in case of a valve failure or other malfunction. This line will redirect the extra water and prevent potentially harmful flooding.
Overall, the softener line will only operate when there’s a regeneration cycle to refresh the resin beads. The overflow line will only operate when there’s a malfunction, and prevent an emergency. The softener line also transports a very large amount of wastewater, while the overflow line is designed for handling the excess water on occasion.
Water Softener Drain Line Installation Steps
A water softener drain line requires proper installation to ensure that your device is working properly and complying with the local plumbing regulations. Our WaterMart installation expert can determine the exact ideal setup for your system. Here are the general steps you can expect when installing a water softener drain line on most models:
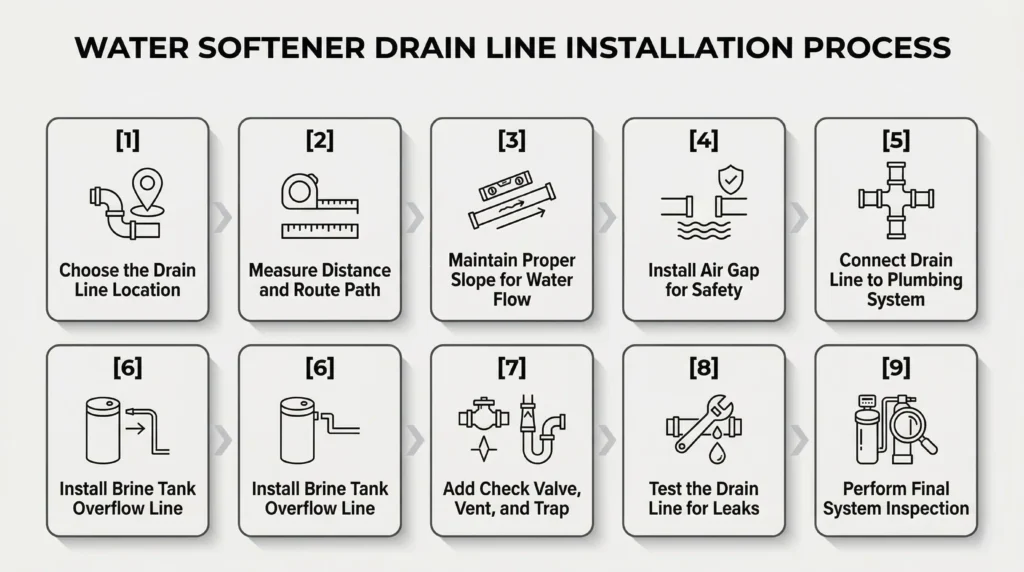
1. Choose the Drain Line Location
First, select a viable drainage point for the line. These may include standpipes, laundry drains, floor drains, utility sinks, and so on. The drain should be able to handle the large wastewater flow rate and also be at a suitable distance from the water softener unit. Connecting the line directly to a sealed tube or pipe will lead to backflow contamination, so always leave an air gap.
2. Measure Distance and Route Path
The next step is to note the distance between the drain location and the softener valve. Make sure the line’s route isn’t too long or has any sharp bends. Remove any obstacles or twists in the line that might restrict the water flow. If the route is too long, consider PVC piping or durable tubing that will maintain water pressure and not leak easily.
3. Maintain Proper Slope for Water Flow
The water softener drain line should always slope downward from the unit to the drain point. One rule of thumb is to ensure a quarter inch of drop per foot in the drain pipe tubing. With the right slope, you’ll prevent water from pooling in the line, making sure the wastewater freely exits the system.
4. Install Air Gap for Safety
An air gap leaves some room between the drain and the drain line outlet. It prevents the wastewater from flowing into the water system. The plumbing codes in Canada especially require this air gap in every water softener system to ensure it delivers clean drinking water.
5. Connect Drain Line to Plumbing System
After the routing, connect the tubing to the drain port on the water softener unit. You can use clamps or fittings for this purpose.
Secure the tubing at the drain point as well, making sure everything is secure enough to avoid movements even during a high flow of wastewater.
6. Install Brine Tank Overflow Line
After the water softener drain line, you need to attach an overflow tube to the safety port in the brine tank. Make sure the brine tank overflow line is distinctly separate from the drain line. It should also drain the excess water in a visible area so that homeowners can detect an overflow problem easily.
7. Add Check Valve, Vent, and Trap
For some water softener models, the installation may require the following:
- Check valve: For preventing backflow into the water softener system.
- Vent: For allowing air inside the system to ensure complete drainage.
- Trap: For stopping sewer gases from coming back within the drain line.
8. Test the Drain Line for Leaks
Before everyday use, run a manual regeneration cycle to test the water softener drain hose installation. Check the drain line, especially during the rinse and backwash steps, to make sure there aren’t any obstructions or leakages.
9. Perform Final System Inspection
Inspect the entire system to ensure:
- The water softener drain line is securely connected and properly sloped.
- There is a visible air gap and no clogs or obstructions.
- All drain lines are routed correctly.
Common Water Softener Drain Line Installation Mistakes
Installation mistakes can result in a malfunctioning water softener and perhaps make your system violate local plumbing codes. Here are some of the most common errors to avoid:
- No air gap, which might lead to contamination backflow.
- The drain line is too high or too far from the unit, which reduces discharge pressure and leads to improper drainage.
- An improper slope, leading to pooling water and faulty drainage.
- A direct connection to sewerage lines with no protection.
- Too-narrow tubing, which can restrict water flow.
Why a Proper Drain Line Matters
Your water softener drain line is a major component of the unit. If it isn’t installed correctly or blocked in any way, your water treatment will be incomplete. Let’s now have a look at the plumbing code requirements and essential steps to take for proper drain line installation:
Plumbing Code Requirements for Drain Line Installation
There are certain Canadian plumbing codes for water softener drain lines, with the main requirements including:
- A visible air gap for preventing backflow and contamination.
- Proper discharge and drainage points, such as a standpipe or floor drain.
- Secure connection and mounting to avoid leaks or shifts.
- Large enough pipe diameters to handle the water flow.
- Adequate pipe diameter to handle flow rates
Essential Tools, Materials, and Pipe Sizing
You need the correct materials and tools for proper water softener drain line installation. Some of the main items include:
- PVC pipes or flexible, sturdy tubing (½-inch to ¾-inch).
- Connectors and clamps for the hoses.
- Measuring tape.
- Cutters for pipes or tubes.
- Air gap fittings.
- Check valves.
- Level to measure slope.
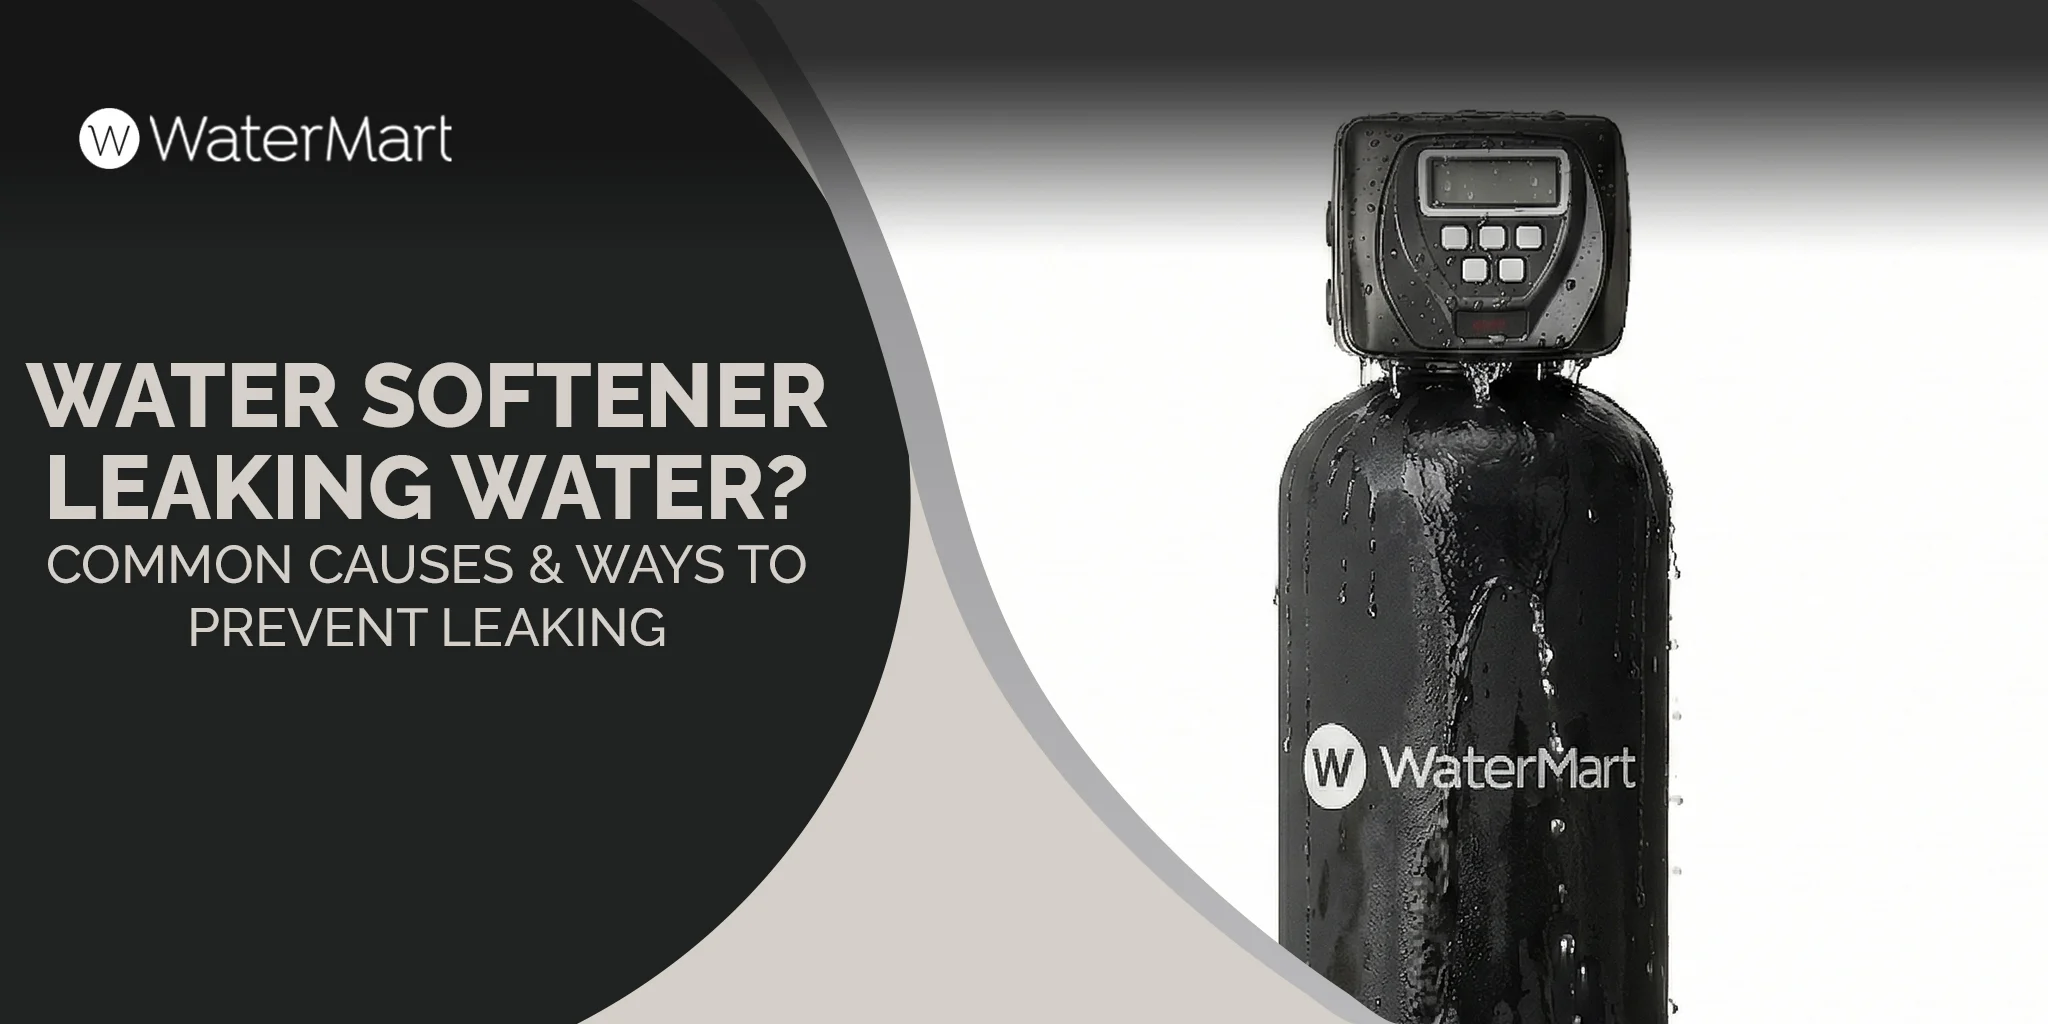
Signs Your Water Softener Drain Line Needs Repair
Your drain line will show certain signs or issues when it needs arepair or replacement. Your maintenance schedule should ideally stave off any major problems, but the following signs may show up at any time:
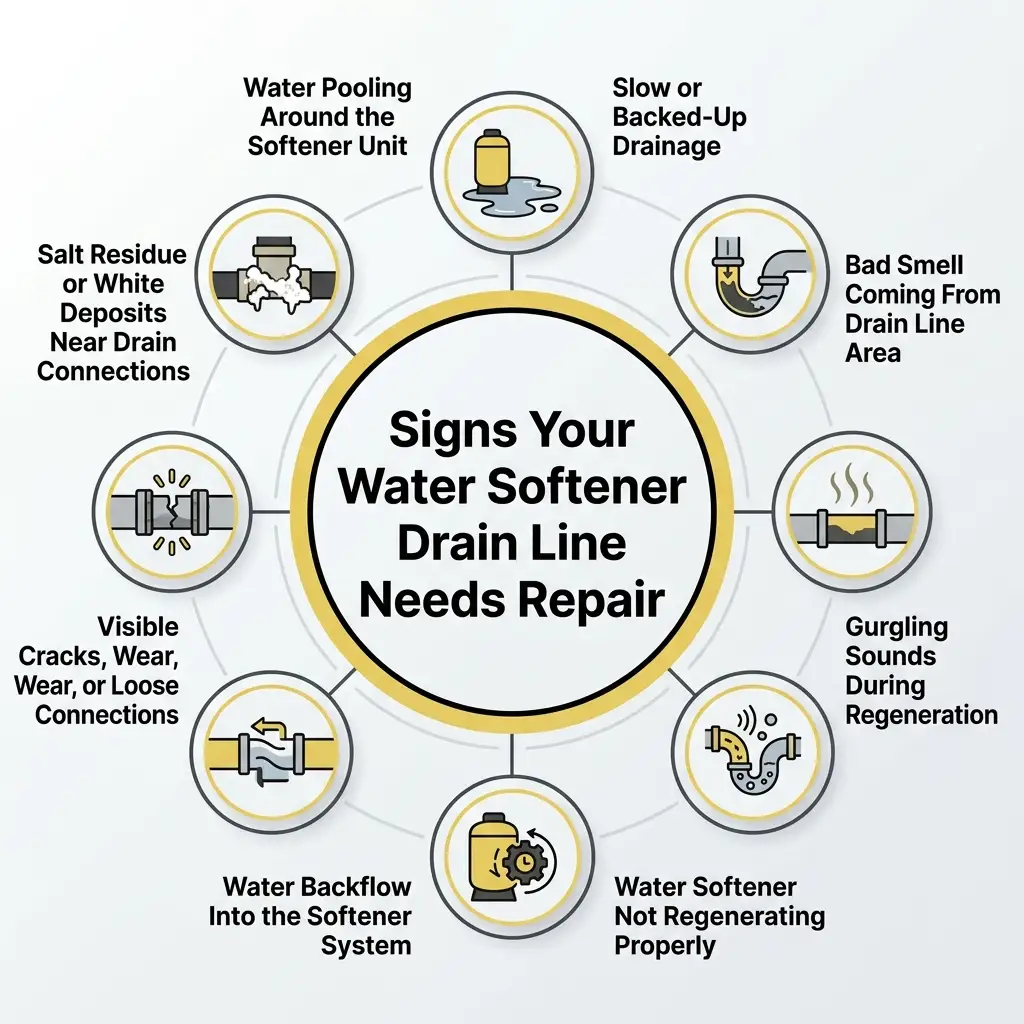
Water Pooling Around the Softener Unit
If you see standing water at the softener’s base, there might be a leakage or disconnection in the drain line.
Slow or Backed-Up Drainage
Slow drainage during or after the regeneration cycle usually signals a blockage or improper slope in the drain line.
Bad Smell Coming From Drain Line Area
Stagnant water will result in an unpleasant smell and perhaps some mold growth as well.
Gurgling Sounds During Regeneration
If there are gurgling noises during the regeneration process, they might be signs of poor venting, clogs, or an air blockage.
Water Softener Not Regenerating Properly
If the regeneration process is not working properly, you may have an obstructed drain line preventing proper wastewater discharge.
Water Backflow Into the Softener System
Backflow will occur when there’s plumbing pressure or when there’s an insufficient air gap, making the water go back in the line.
Visible Cracks, Wear, or Loose Connections
The drain tubing or pipes may loosen and crack with time. Make sure to replace any damaged lines immediately.
Salt Residue or White Deposits Near Drain Connections
Any white deposits near your drain connections may signal salt buildup and small leaks. Your drain system may also have connection issues in such cases, so conduct a thorough check if you notice salty or white deposits near the drain connections.
Troubleshooting & Maintenance Tips
Regularly maintaining your water softener system will prevent many drain line issues and also ensure your unit performs efficiently. Some of the most important maintenance steps include:
- Inspect the drain tubing for leaks every 2-3 months.
- Flushing the drain line occasionally to remove salt buildup and debris.
- Making sure there are no obstructions in the air gap.
- Checking the slope to make sure it hasn’t changed with the moving pipes.
Why Professional Installation by WaterMart Experts Is Better Than DIY
DIY installation might save you some time, but the risk factor is too high. With professional services by WaterMart, you’ll get experienced personnel who know the plumbing codes and proper sizing for your water softener drain lines. They will also utilize the best routing methods, which ensure your unit’s optimal performance.
Not just that, but an expert will be able to identify any potential problems like incorrect connections or an inadequate capacity in the drainage system. With proper installation, your drain line will also integrate nicely with the existing plumbing and save a lot of hassle in the future.
FAQs about Water Softener Drain Lines
How long and high can I run the drain line before performance drops?
Your water softener should allow the drain lines to run around 8 feet in height and 30-40 feet in length. Beyond these limits, the system might not be able to move wastewater, resulting in slow drainage or poor regeneration. However, the limits of the drain line often vary according to the specific manufacturer and model.
Can I connect my water softener drain line to a washing machine drain?
Yes, it’s possible to connect the drain line to a laundry standpipe, but the installation should include an air gap to avoid backflow contamination.
Why is water coming back into my water softener drain line?
This is called backflow, which happens when you don’t have an air gap, when there’s plumbing pressure forcing the water back, or when there’s a drain clog.
How do I know if my drain line slope is correct?
Your line has the correct slope if it’s continuously going in the direction of the drain. You’d know something is wrong if there’s water pooling inside the tubing.
Can a water softener drain line freeze in winter?
Yes, a water softener drain line can freeze during the harsh winters in Canada. You can prevent this by ensuring that the line is insulated or in a heated area at all points.
Can I run my water softener drain line outside my house?
Technically, it’s possible to run the drain line outdoors, but this setup is probably not meant for Canada’s cold climate. Lines outdoors are even more susceptible to damage, blockages, clogs, and freezing.
Final Thoughts
Water softeners are essential in many Canadian homes. They enhance your water quality, protect your appliances, and also extend the life plus performance of your existing plumbing system. However, water softener setups require proper drain line installation for the best possible function.
Correct installation will ensure that the regeneration wastewater flows easily and safely away from the system without any leaks or contamination. Every installation step is important, along with regular troubleshooting and maintenance to prevent serious issues. A timely repair or water softener drain line replacement can save a lot of hassle and ensure the system’s optimal performance in the long run.
At WaterMart, our professional technicians are always available for our valued clients’ convenience and peace of mind. Get in touch with our team today to ensure the best installation for your water softener drain line.