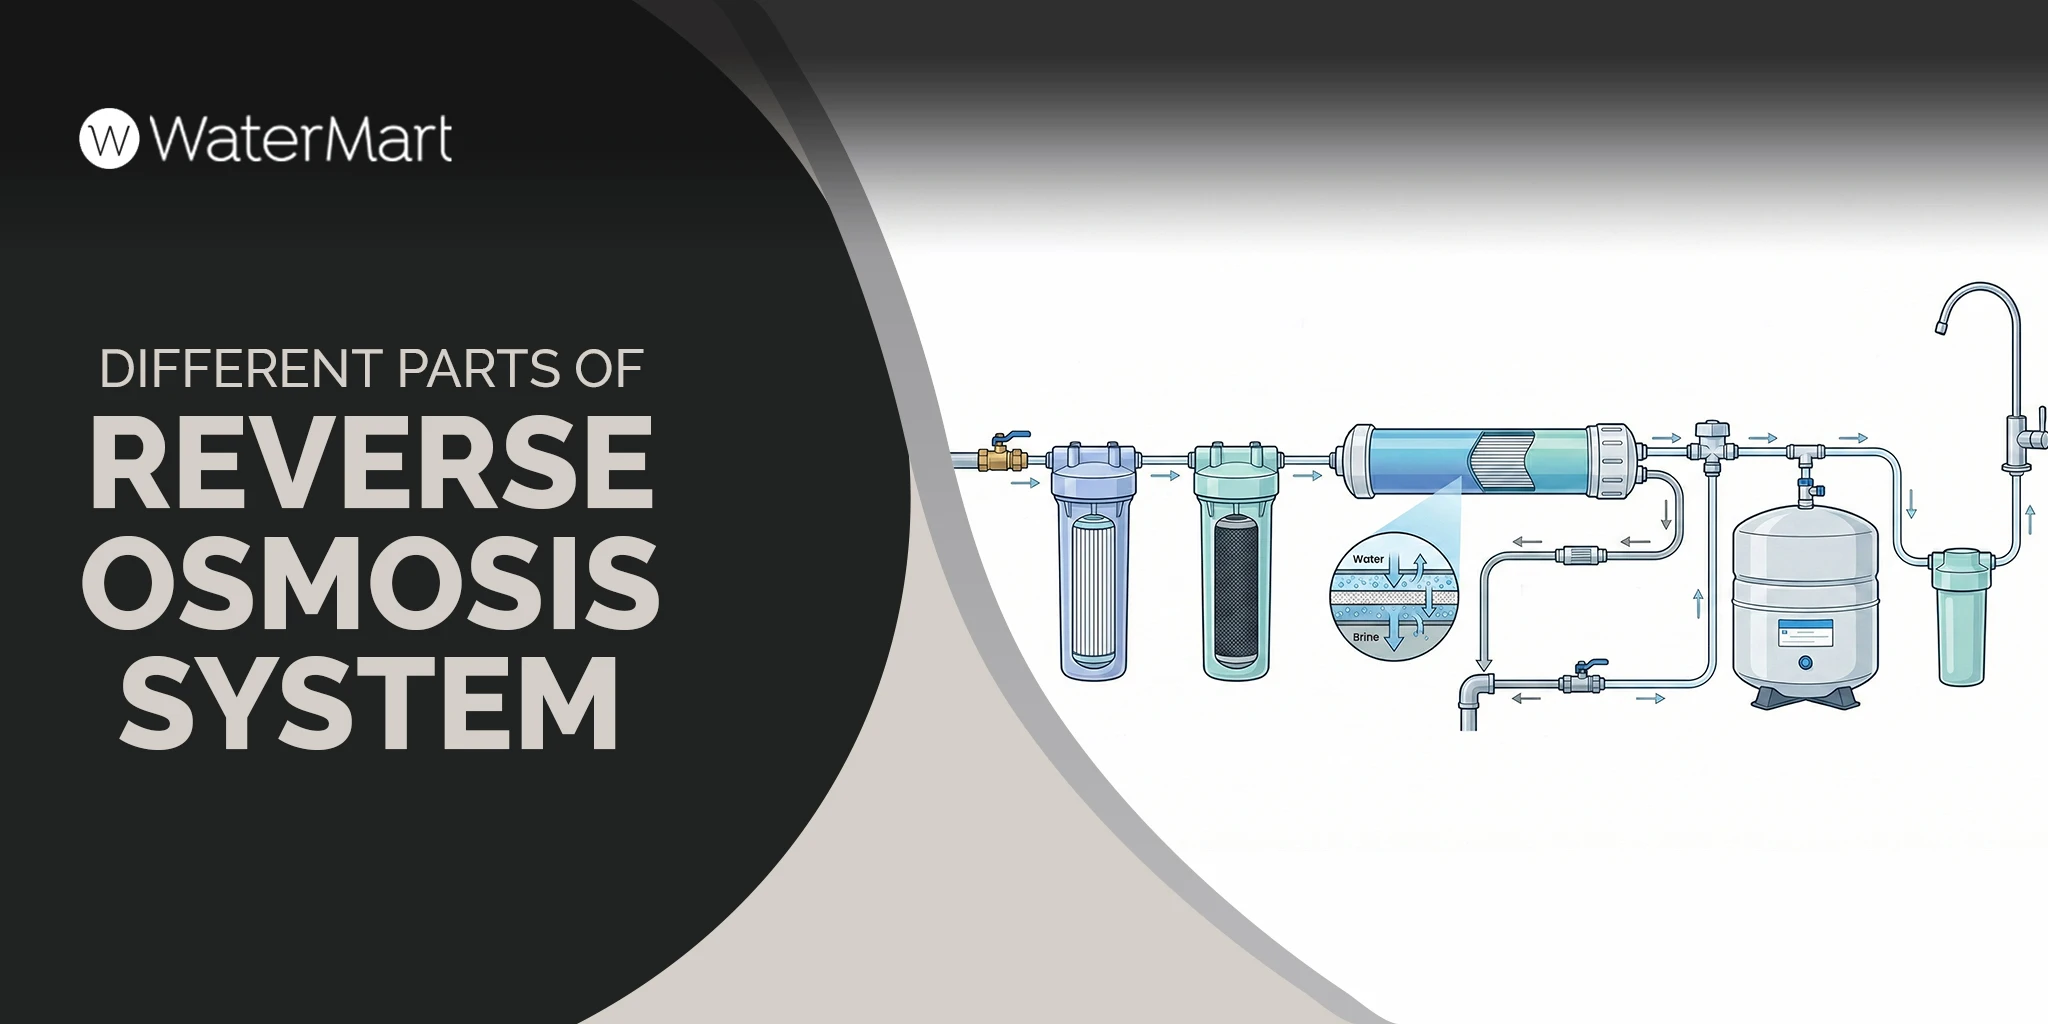
How To Install a Kitchen Faucet?
Replacing a kitchen faucet is necessary because the faucets turn rusty and old over time, reducing the water flow. However, to save oneself from the cost of hiring a plumber to do the job, numerous people avoid installing a new one (the cost varies from $150 to $400 in 2024).
Luckily, with the right tools, installing a kitchen faucet is no harder than a DIY project. Instead of hiring an expert, you can do this task by yourself! But what you need is clear guidance on the installation process.
As an installation expert, we have discussed clear and easy instructions that you can follow for installing kitchen faucets. We will cover important areas like:
- Tools Required For The Process
- Proper And Simple Steps
- Tips And Techniques For Successful Installation
- Common Questions Among Customers
What You’ll Need for The Kitchen Sink Faucet Installation?
Before you begin, you need to either purchase or find out some important plumbing tools and materials essential for the removal and installation of the kitchen faucet. If you just sit down to start installing a kitchen faucet without the availability of the required equipment, the process can never be successful. Let’s look into some of the tools you need to get.
Equipment/ Tools
The tools needed for the installation of a kitchen faucet are very common and can be easily found in any nearby hardware store or your tool bag. So, there is no need to worry about the inconvenience of finding the tools. The list of plumbing equipment is:
- Plier
- Adjustable Wrenches
- Putty Knife
- Rubber Gasket
- Nuts
Materials
The materials or things that you may need during the process are listed below.
- Kitchen Faucet
- Bucket
- Plumber Tape
- Cleaning Agent
- Soft Cloth (Fiber)
As soon as you have all the tools and materials, read the steps below carefully and start implementing them.
Step-by-Step Guide On Installing a Kitchen Faucet
There are many different types of kitchen faucets on the market, but each has a different removal and mounting process. Therefore, it is best if you first read the manufacturer’s manual that comes with your kitchen faucet box. There isn’t much difference with the procedure, but there will be slight changes in the use of tools and the method of fixing the faucet in place.
Anyhow, the steps below follow a generalized method of replacing an old faucet with a new one, so you can follow them without any worry.
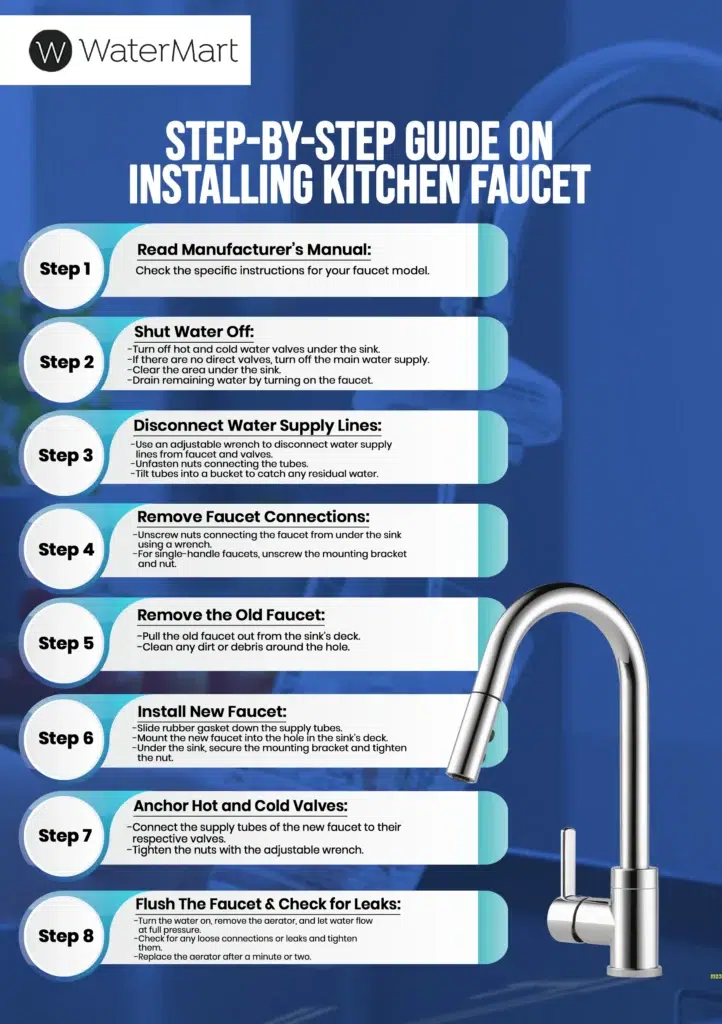
Shut Water Off at Supply Valves
First, shut off the hot and cold water valves to the sink. If you do not have a direct water supply under your sink, you need to turn off the main water supply. If the valves are stuck or harder to rotate, you can use a pair of pliers. Once this is done, clear the area under the sink. Put a small bucket inside the sink and turn on the faucet to drain any extra water running into it.
Disconnect Water Supply Lines
Next, use an adjustable wrench to disconnect the water supply line between the faucet and the supply valves. Unfasten the nuts connecting the tube. When the tubes are disconnected, tilt them in a bucket to ensure no water is leaking from the lines.
Remove Faucet Connections
Before removing the faucet, you need to remove its connections. For this, you should use the wrench to unscrew the nuts that connect the faucet from under the sink to the hose (supply lines). If you have a single-handle faucet, it is secured on a mounting bracket and nut that can be unscrewed easily.
Remove the Old Faucet
After removing the connections, you need to know to unmount the old faucet from its hole in the sink’s deck by pulling it out. Use the cleaner and the cloth to remove any dirt or debris surrounding the hole.
Install New Faucet
Now, it is time to install the new faucet. Pick up the rubber gasket and slide it down the supply tubes. Then, carefully mount the faucet onto the hole in the sink’s deck. Under the sink, add the mounting bracket and tighten the nut to fix the faucet in place.
Anchor Hot and Cold Valves
The next step is simple. You have to hold the supply tubes of the new faucet and connect them with their respective valves carefully. After that, tighten the nuts using the adjustable wrench.
Flush The Faucet & Check for Leaks
Your faucet is finally installed! But before you start using it, you have to turn the water on, remove the aerator, and let the water flow at full pressure. At this stage, you can look for any loose connections or leaks and tighten them. After a minute or two, put the aerator back in place and enjoy using your new faucet.
Tips for Installing a Kitchen Faucet
Sometimes it is difficult to loosen the nuts or remove the mounting bracket because it might be fixed too tightly. A simple trick to prevent this issue is to use a lubricant (oil). This reduces friction between the nuts, and they can be easily unscrewed. Another tip is to apply medium pressure when removing the faucet so that you can get it out of the caulk seal without breaking anything else.
Do You Need an Expert or Can You DIY?
The simple answer is: You can DIY. Since the steps for installing the faucet are very simple and you do not need any demanding or complex materials for the procedure, you can do it yourself without the service of an expert.
However, if you are worried about the risks of loose connections or harming the hardware, you can hire an expert for the job as well. WaterMart provides exceptional water filtration system services to all its customers and has a team of highly trained installation experts. They are very professional and approachable and will install your faucet properly, leaving no room for doubt.
What Are The Top Advantages Of A Kitchen Faucet With Sprayer?
Replacing your old faucet with a new one has many benefits. Number one is that the pressure and the flow of water become faster and better. Here’s a list of many other advantages of a kitchen faucet with a sprayer:
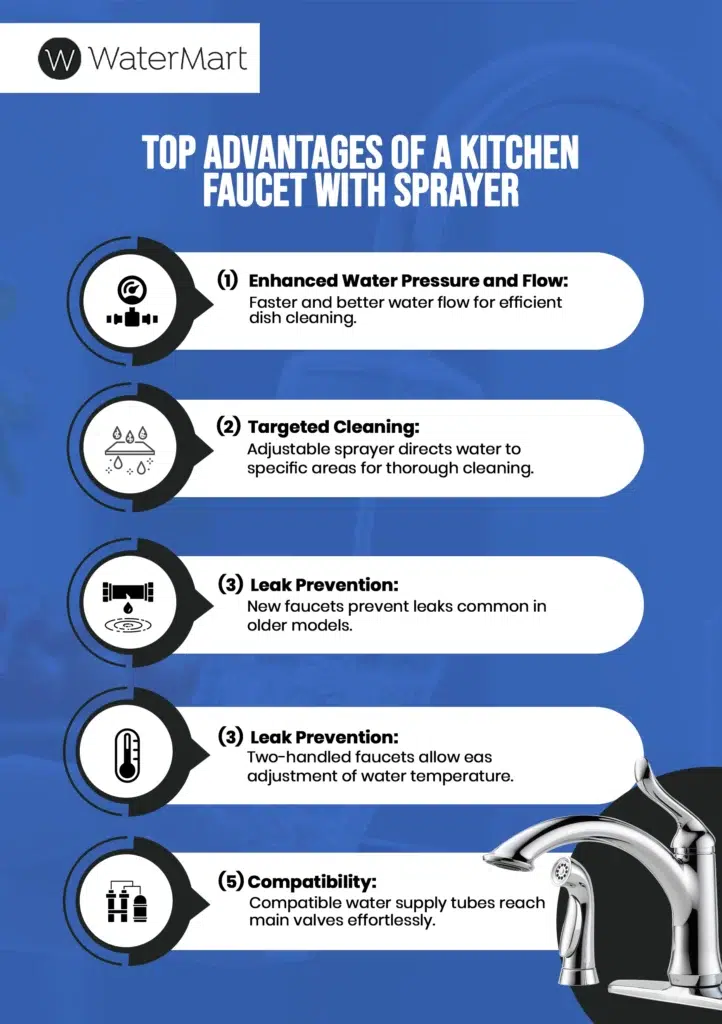
- Easier to clean dishes because the flow of water is quicker.
- You can adjust the sprayer and point it towards the specific area where you need the most water.
- Prevents any leaking that your old faucet may have caused.
- A two-handled faucet can also help adjust the temperature of your water.
- The kitchen faucet with sprayer also has a compatible size water supply tube that can easily reach the main valves.
With these benefits, changing the kitchen faucet is definitely an advantageous decision.
What To Do After the Installation of a Kitchen Faucet?
Although there are minimal chances of any leaking, it is a preventive measure to keep a regular check on any holes or leaks in the faucet’s connection. If there is any issue, you can call a plumber for immediate maintenance. It is also important to keep your faucet clean using a multi-purpose cleaner and a fiber cloth so that there is no debris in the aerator or the end of the spout that can mix in the water.
Conclusion
We hope that you have understood all the steps, tips, and maintenance techniques for installing the kitchen faucet. It is a good choice to upgrade your kitchen faucet now to enhance your kitchen style and water flow. However, if you still find the installation process hard to grasp, our team of water filtration experts can help you.
You can contact WaterMart Toronto now and make an appointment. Our professional technician will be at your doorstep soon to install the faucet expertly. You can also sign up for a service contract to avail yourself of our installation and maintenance services.
FAQs
How long does it take to replace a Kitchen Faucet?
It usually takes an hour or two, but it may take longer, depending on the type of faucet and how expert you are with the tools.
How to Change a Kitchen Faucet?
It is a simple process. You have to turn off the main water valves, disconnect the tubing, and remove the faucet. Then, you mount the new faucet with the nuts and connect it.
Is It Hard To Install A Kitchen Faucet?
No, but you should be familiar with the basic plumbing tools, like a screwdriver and adjustable wrench.